Embody Fitness & Nutrition
  • Blog
  • Recipe Index
  • Cooking Videos
  • About Me
    • Additional FAQ's
    • Published Work
  • Contact

Banana Blueberry Acai Bowl

12/24/2016

0 Comments

 
Picture
This may or may not be my last post for 2016. And what better way to end the year than with one of its most delicious food trends!

I would like to express a huge, heartfelt thank you to everyone who has visited and re-visited my site this year. I truly enjoy cooking and sharing my recipes with you. My hope is that these posts will inspire you all to take better care of yourselves, putting more of a premium on what you put into your bodies and reaping the benefit of better health. And that you will keep returning to see what I have coming next!

I intend to keep the recipes flowing for 2017. In the latter half, I may finally have a space to work on some fitness and cooking related videos. And maybe even an e-book or two!

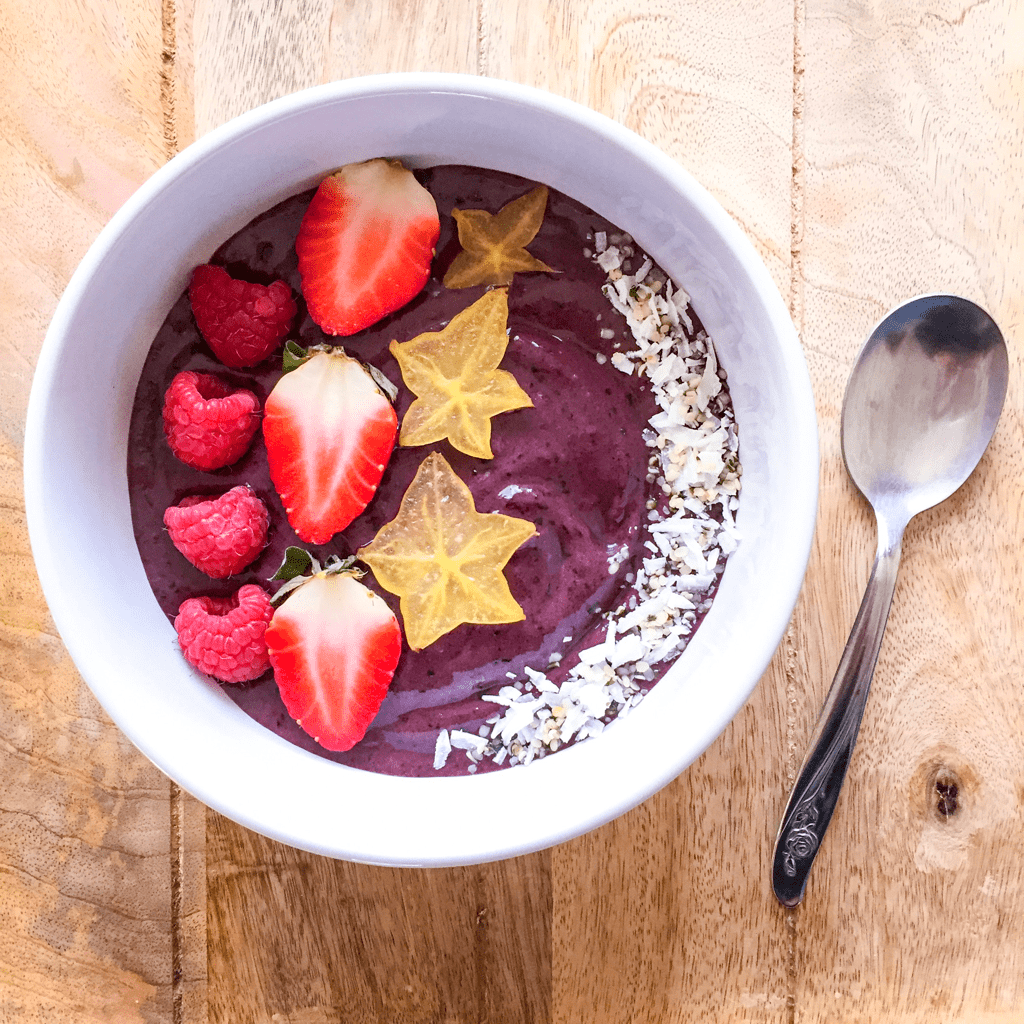
This recipe is made with a frozen acai packet available at Trader Joe's - I am not being paid for my opinion - I just happen to very much enjoy the convenience of this product. Pop it in the blender with your favorite fruits and it makes a quick and easy meal. I'm eating mine for lunch as I type, on this very merry Christmas Eve. 

Enjoy! May the New Year bring you good health, joy and very few snowflakes!

Ingredients:
1 large banana, peeled
1 frozen acai packet
1 handful frozen blueberries
handful mixed fresh fruit
1 tablespoon coconut flakes
1 teaspoon hemp seeds

Directions:
In a blender, puree the banana, acai and blueberries until thick and smooth. Transfer to a bowl with a rubber spatula. Swirl the mixture around a bit with the spatula to even it out. Top with fruit, coconut and seeds. Serve immediately.

Yield: 1 serving

0 Comments

{Vegan} Key Lime Mousse with Cherry Sauce

12/21/2016

0 Comments

 
Picture
Does anyone notice the terrarium effect here? Almost too pretty to eat! But don't wait too long, because exposure to oxygen will eventually cause the mousse to brown. Kind of ruins the whole eat-with-your-eyes effect.

Ironically, when I truly love something, it tends to sit untouched. For some silly reason, I have this impulse to save it - for what I don't know. Case in point, there is an apple pie scented candle that I have been hanging onto for YEARS because it smells so amazing. But instead of lighting it, I keep on using up the less worthy candles in my collection. In fact, burning fiercely from atop my table as I write this, is the most repulsive pine candle I have ever smelled - surely a regift from someone who was desparate to get rid of the thing.

Similarly, I have a bag of dark cherries in my freezer that I can't bear to part with. Even though the store where I purchase them is located just 15 minutes down the road. Instead, I buy, eat and re-buy frozen raspberries - which I like well enough, but not nearly as much as the cherries!

In trying to break myself out of this funny pattern, I'm putting my prized ingredient to good use here. Nice and sweet, the cherry sauce offsets the tangy lime mousse which on its own might be a bit tart. Combined with the crunchy toasted almonds, it makes for a very tasty dessert!

This is a vegan treat, so even a person with severe dairy intolerance can enjoy it. Some might wonder why a vegan recipe would be posted on a blog that is clearly not strictly vegan. Well, this particular blog doesn't discriminate. The focus here is finding ways to supply the body with the nutrition it needs, largely through plant-based foods, without excluding the occasional hankering for meat, fish or even cheese.

So that you might add to your own collection of much-loved treasures, I've included links to some of my favorite cookbooks just beneath this recipe. These I do use regularly, cooking a variety of recipes from each one. But even if you prefer to admire rather than use these books, the photographs and the writing that they contain are wonderfully uplifting and inspirational.
Picture
Ingredients:
2 cups frozen pitted dark sweet cherries
1 tablespoon cornstarch
​1 tablespoon lime juice
1 tablespoon vanilla paste
2 tablespoons maple syrup
1/2 cup sliced almonds
1 large banana, peeled
1 tablespoon lime zest
juice of 2 limes
1/4 cup confectioners sugar or maple syrup
2 large avocados, peeled and pitted
2 sprigs fresh mint or thinly sliced lime

Directions:

CHERRY SAUCE:
Combine the cherries and cornstarch in a sauce pan, stirring until the cherries are coated with the cornstarch. Add the lime juice, vanilla and syrup. Heat over medium-high, stirring frequently until the cherries thicken and reduce, about 8-10 minutes. Remove from heat and set aside to cool. Spoon about half of the sauce into the bottom of two stemless wine glasses, leaving enough leftover to top the prepared mousse.

TOASTED ALMONDS:
Pour the almonds into a sauté pan and toast over medium heat, until lightly browned on both sides. Remove from heat and pour the almonds into a bowl to stop the cooking process. Allow to cool, then sprinkle half of the nuts over the first layer of cherry sauce.

KEY LIME MOUSSE:
Fit a piping bag with a wide tip such as the Wilton Star Tip #2110. In a food processor or blender, combine the banana, zest, lime juice, sugar, (or syrup if using) and avocados. Puree until thick and smooth. Using a rubber spatula, transfer the mousse into the piping bag and pipe equal amounts into both serving glasses. Top with remaining cherry sauce and almonds. Garnish with sprigs of mint or slices of lime.

Yield: 2 servings

My Favorite Cookbooks This Year:
Yum
0 Comments

Shrimp with Romesco Sauce and Cauliflower Rice

12/18/2016

0 Comments

 
Picture
Talk about Spanish comfort food! The sauce featured here made an appearance back in one of my earliest posts titled Salmon Cakes with Romesco Sauce. I decided to bring it back to the forefront of my blog because it has always been a crowd pleaser. 

I was going for quick, easy and healthy today. Literally, this took about 10 minutes to make. ​After I ate, I felt as if I were floating on a cloud. Nothing weighed me down. No 3pm lethargy. Just a really amazing lunch that tasted great and made me feel even better. 

All I had to do was sauté some shrimp - typically five per serving - blend up my 6-ingredient sauce which then made its way into the pan for a little simmer time with the shrimp. While that was bubbling away, I tossed my cauliflower rice into another pan with the herbs and seasoning. In about 5 minutes, it too was heated through and I was ready to load up my plate. 

​Romesco sauce is very versatile and traditionally served with red wine. It can be served at any temperature for dipping or as a full blown tomato-esque sauce. Pair it with seafood, chicken, pasta, farro, rice, roasted vegetables or as the base for a Spanish-style Zuppa di Pesce. Spread it onto a baguette with sliced cheese, artichokes and pitted spanish olives. There are so many ways to use it - but I recommend starting right here with this dish. MINUTES - that's all it takes for this delicious hot meal!
Picture
Ingredients:

​Shrimp with Romesco Sauce:
7-8 ounce jar roasted red bell peppers
2 cloves garlic
1/2 cup sliced almonds
1 tablespoon sherry vinegar
1 sandwich roll, diced, optional*
1/8 cup extra virgin olive oil + 1 tablepsoon reserved
20 large shrimp, peeled and deveined

Cauliflower Rice:

24 ounce bag frozen cauliflower rice, or 1 head cauliflower finely minced
2 scallions, rinced and roughly chopped
3 sprigs fresh thyme, de-stemmed
salt and pepper to taste

Directions:
Drain the peppers, reserving the juice for later use. In a food processor or blender, puree the peppers, garlic, almonds, vinegar, roll and olive oil until smooth and set aside. In a sauce pan, heat the oil over medium-high and sauté the shrimp until lightly browned on both sides. Add the sauce, lower the heat and simmer until the sauce is warm, about 3-5 minutes. Use the reserved juice to thin out the sauce as needed.

In a separate sauce pan, add the cauliflower, scallion, thyme, salt and pepper. Cook over medium-high until hot, stirring frequently to prevent sticking.

Plate the cauliflower rice and shrimp. Top with the sauce. Serve immediately.

Yield: 4 servings
Yum
0 Comments

Chocolate Gingerbread Cake {Gluten-Free}

12/12/2016

0 Comments

 
Picture
Happy December! This is my birthday month, which could not be less fitting for a person who dislikes winter. And this year is a huge milestone one, which I would love to be spending on a beach somewhere. But alas, my husband and I are neck deep in a house-flipping adventure. So instead, we'll be spending a couple of nights in a beautiful New York City hotel overlooking Central Park, using travel points that I keep in my aresenal for just such an occasion. Despite the cold, I'm looking forward to some serious museum, Broadway and park time. 

So, in honor of my birthday, I've been fighting with this cake. My intention was to post the recipe this time LAST week, but I wasn't happy with the spice-to-chocolate ratio. First it was too bland. Then it was too overpowering to taste any chocolate. The one constant was the texture. This cake came out moist and light every time. 

There is a lot of room to make this cake to your own liking depending on which end of the flavor ratio you like best - chocolate, gingerbread or both? Jazz it up with frosting, or use a stencil to create a sugary winter scene like the one pictured. Toss chocolate chips or spicy candied ginger into the batter for a little zing. As written, this recipe tries to balance the two flavors equally, though personally I prefer my cake a bit more gingerbready.
Picture
Ingredients:
cooking spray
2 cups gluten free oat flour
1/4 cup natural unsweetened cocoa powder
1 teaspoon baking powder
2 teaspoons ground ginger
1 teaspoon cinnamon

1/2 teaspoon ground cloves
1/2 teaspoon ground nutmeg
​1/2 cup semi-sweet chocolate chips
1/4 cup coconut oil
1/3 cup unsulphured molasses
1/2 cup coconut or dark brown sugar
1/2 cup unsweetened almond milk

2 large eggs
1/2 cup semi-sweet chocolate chips, optional*
1/4 cup diced candied ginger, optional*
1/4 cup powdered sugar, optional*

Directions:
Pre-heat the oven to 350ºF. Grease an 8x8 non-stick baking pan with cooking spray.

In a large mixing bowl, sift together the flour, cocoa, baking powder, ginger, cinnamon, cloves and nutmeg. Set aside.

In a non-stick saucepan, melt the chocolate chips, oil, molasses and sugar over medium-high heat, stirring constantly until smooth. Remove from heat and allow to cool slightly. Stir in the flour mixture and milk, a little at a time, until a batter forms. Whisk the eggs into the batter, which should now be thin and fairly liquidy. Fold the chocolate chips or candied ginger into the batter, if using. Pour the batter into the baking pan and bake for 20-25 minutes, or until a toothpick comes out smooth. Allow to cool, then top with powdered sugar or frosting of choice.

Yield: 9 servings

Start the New Year right with this offer!
Spring eBook Pack
Yum
0 Comments
    Fitness Training:
    Located in the Hudson Valley or Westchester NY? Contact me for a trial in-home fitness training session!

    Author

    Sarah Inglis is a increasingly vegetarian non-vegetarian, as well as a certified fitness trainer, personal chef, freelance writer and food photographer with degrees in media communications and dietetics. This blog is a collection of healthy recipes, along with a bit of fitness & nutritional information.

    Links

    Affiliate links to products I use and think are great are posted on this site. This means I receive a small commission if you purchase a product through these links, though at no extra cost to you. This is both to cover costs for the blog and to provide helpful tools to the reader. Thank you for supporting Embody Fitness & Nutrition!

    Categories

    All
    Appetizers
    Breakfast
    Burgers/Sandwiches/Tacos
    Desserts
    Entrees
    Fitness Info
    Juice Recipes
    Nutritional Info
    Salad
    Sides
    Snacks
    Soup
    Toppings
    Travel

    Archives

    January 2018
    December 2017
    September 2017
    August 2017
    July 2017
    June 2017
    May 2017
    April 2017
    March 2017
    February 2017
    January 2017
    December 2016
    November 2016
    October 2016
    September 2016
    August 2016
    June 2016
    May 2016
    April 2016
    March 2016
    February 2016
    January 2016
    December 2015
    November 2015
    October 2015
    September 2015
    July 2015
    June 2015
    May 2015
    April 2015
    March 2015

    RSS Feed

© 2015-2018 Embody Fitness & Nutrition. All rights reserved. No content or images may be reproduced in any part or form without written permission.
Proudly powered by Weebly