Embody Fitness & Nutrition
  • Blog
  • Recipe Index
  • Cooking Videos
  • About Me
    • Additional FAQ's
    • Published Work
  • Contact

Italian Cauliflower Crusted Chicken

6/19/2017

2 Comments

 
Picture
Unintentionally, a paleo recipe found its way onto the blog. 

Perhaps because my husband and I shared between us an entire round of sourdough bread, among other things, in celebration of his birthday yesterday afternoon. I love bread and carbs in general, but I am so over it all right now. 

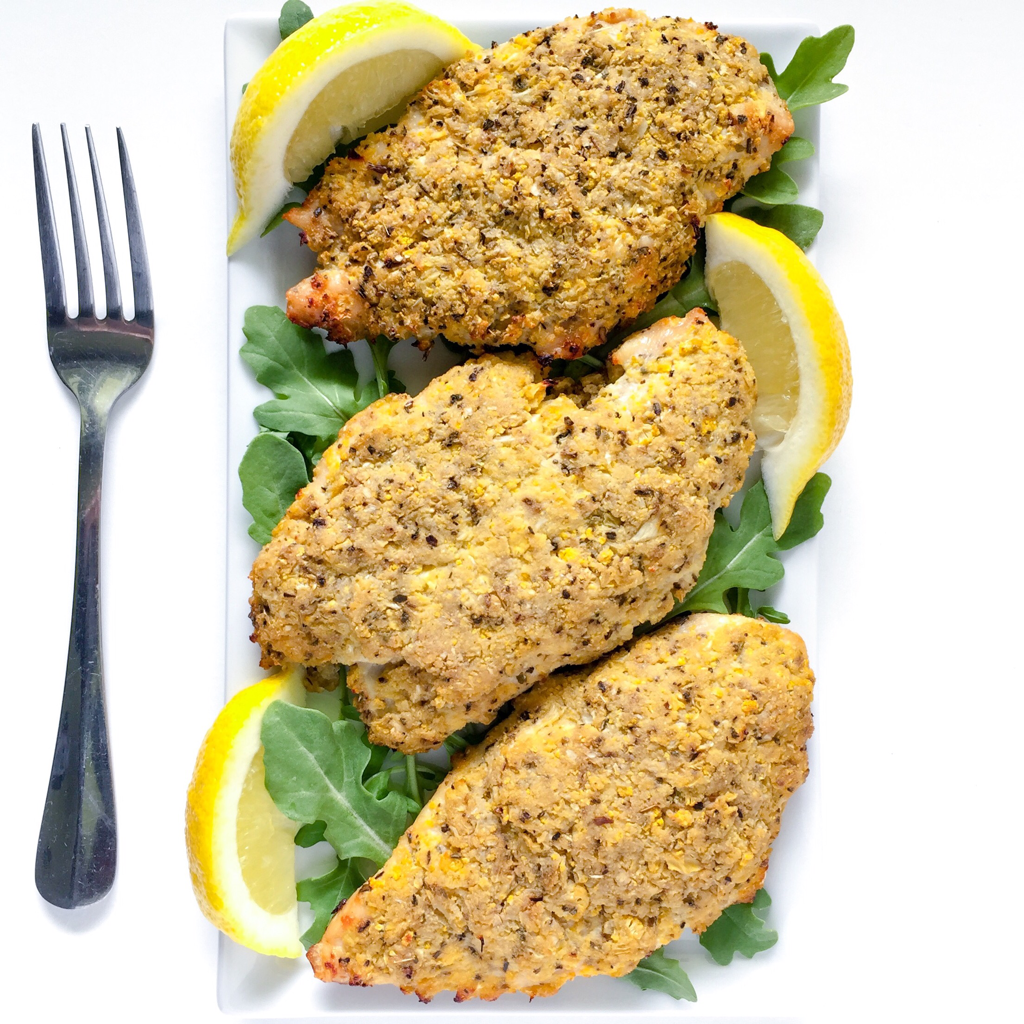
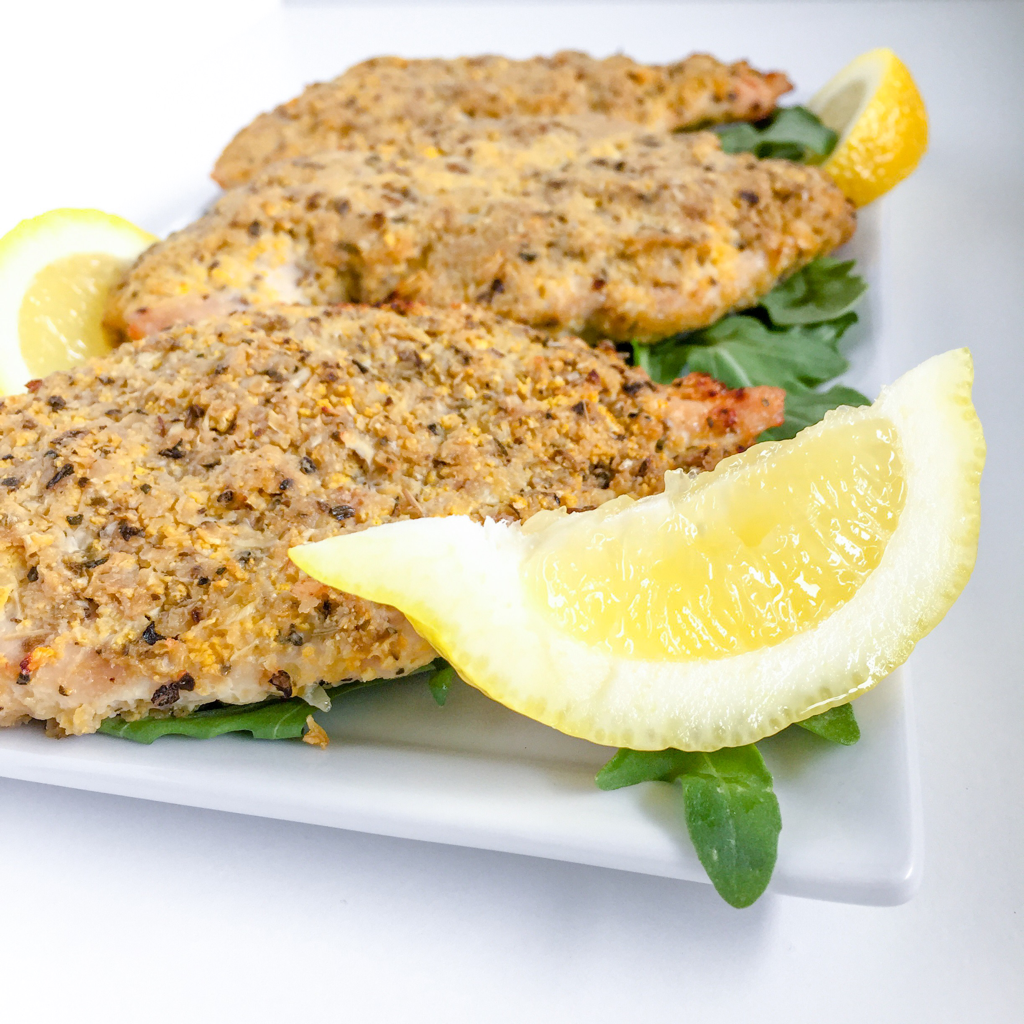
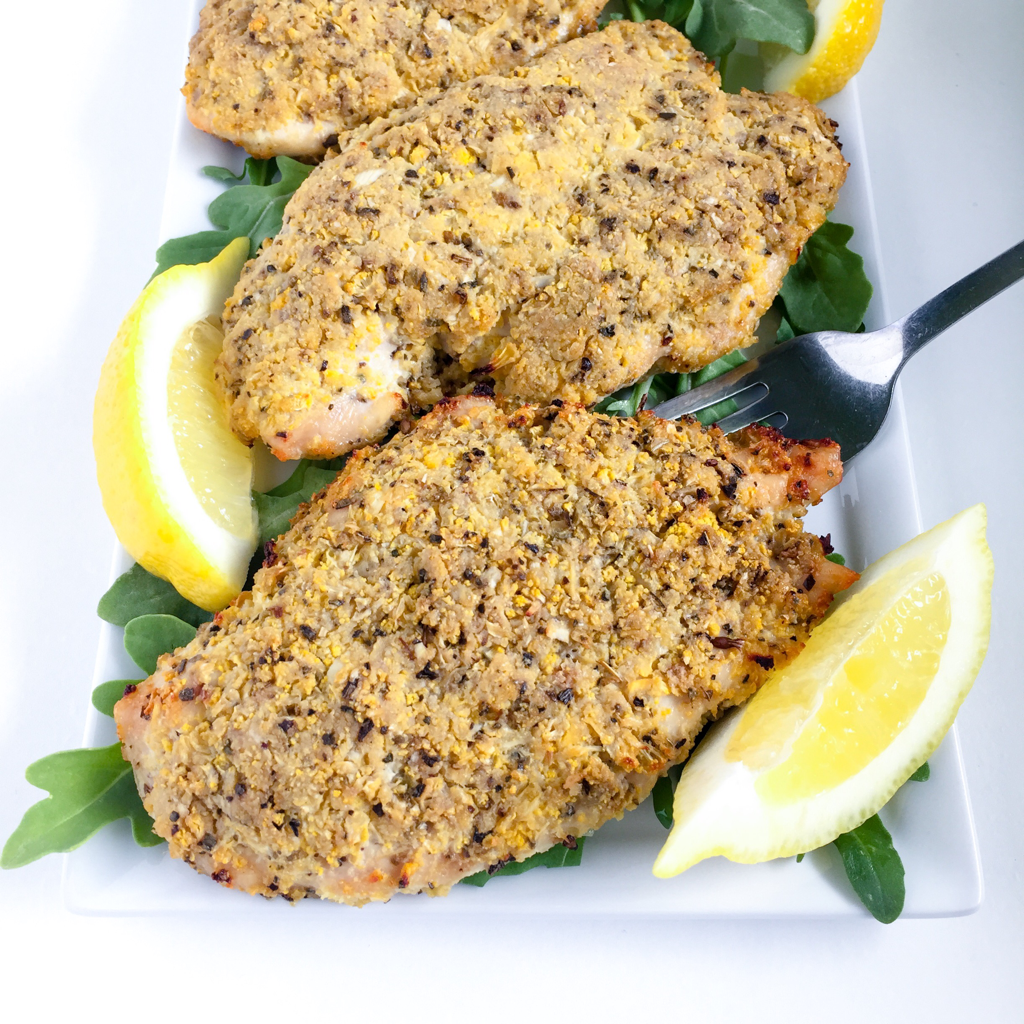
Another blog post titled, Lemon Pepper Turkey Meatballs & Quinoa Stir Fry, got me thinking about other ways to replace traditional bread products with vegetables. Turns out cauliflower works extremely well as a crust for chicken. The trick is to dip the chicken in egg wash, finely mince or "rice" the cauliflower and then firmly pack it onto the meat. From there it bakes up beautifully.

In the recipe below, yellow cauliflower is listed in the ingredients. Any color will do, but the yellow variety is much more visually appealing and comparable to authentic breaded chicken (useful when trying to coax a family member into eating healthier).

It also contains even more nutritional value than plain old white cauliflower, with high levels of beta carotene that the body converts to Vitamin A. Healthy cell growth within the eyes, skin, and organs is bolstered by Vitamin A. Not to mention that cauliflower is also packed with:
  • Vitamin C when eaten shortly after harvest, which assists with iron absorption,
  • Vitamin K, promoting blood clotting and containing anti-inflammatory properties, 
  • Cancer fighting phytochemicals helping to detoxify the body of free radicals,
  • A variety of vitamins and minerals in smaller quantities, that promote overall health and contribute to normal fetal development in pregnant women.

Most importantly, this recipe tastes pretty close to regular breaded chicken. It may not be quite as crispy, but it will work in any dish where breaded chicken is used. Scout's honor!

{Follow me on Instagram for more healthy recipe inspiration!}
Picture
Picture
Ingredients:
extra virgin olive oil
​2 cups finely minced yellow cauliflower 
1 teaspoon dried oregano
1 teaspoon dried basil
1 teaspoon onion powder
1 teaspoon garlic powder
1/4 teaspoon salt
1/4 teaspoon freshly ground black pepper
2 large eggs
1 tablespoon milk of choice
2 boneless chicken breasts, halved lengthwise

Directions:
Pre-heat the oven to 375ºF. Line a sheet pan with foil and drizzle with olive oil.

Stir together the cauliflower, oregano, basil, onion and garlic powders, salt and pepper. Pour half of the mixture onto a large plate and set aside.

Whisk the eggs and milk in a shallow pan. Dip each chicken breast into the egg wash, then place onto the plate of cauliflower. Firmly press several tablespoons of the cauliflower onto the exposed side of the chicken breast, then flip over and repeat until the entire surface of the chicken is coated. Place onto the sheet pan and repeat with the remaining chicken breasts.

Bake for 40 minutes or until the juices run clear and the crust is lightly browned.

Yield: 4 servings
Pin It
2 Comments

Strawberry Watermelon Sorbet Pops

6/15/2017

0 Comments

 
Picture
A slice of summer has finally arrived!

Over the last few days the air has turned hot and heavy with moisture. My fitness clients have been doggedly trudging through their workouts despite the heat - drenched almost to the tips of their ponytails by the end.

In this weather, anyone with a diet not on point is quickly revealed - heat tends to cause extra water retention and bloating. In just 1-3 days, a person who enjoys a few too many processed foods or late night snacks becomes visibly pudgier around their mid-section, as the temperature rises. For a trainer, this is useful information because it tells me when a person is in need of some gentle nutritional nudging.

Personally I crave, and therefore choose, watery fresh fruit over processed crap when it's hot. I suggest others do the same, but I often hear that fruit does not do enough to satisfy their sweet tooth. This is where turning it into a simple frozen dessert can help.

Smoothies blended with frozen fruits, plus a 1:1 ratio of coconut water and orange juice for a bit of sweetness, can hit the spot. Another trick is to blend frozen fruits with unsweetened nut or soy milk and a tablespoon of jam for that extra sweet kick.

Fresh fruits can be turned into sorbet-like popsicles. With watery fruits like melon and berries, the trick to preventing a solid "rock-sicle" effect, is to add a small amount of simple syrup. This ingredient is generally not necessary when using pulpy fruits such as mango, pineapple or bananas, which also have higher concentrations of sugar.

To kick off the season and motivate you all to start making your own healthy treats, I'm posting a very basic recipe. No veggies, herbs or strange ingredients in today's post.

If popsicle molds are not among your kitchen gadgets, just pour the purée into freezable serving glasses or a container. When ready to use, allow it to sit for a minute at room temperature before scooping it out.
​
​Go ahead and bookmark this recipe! The next time you find yourself suffering from a post indulgence puffy tummy, toss out the ice cream and any other junk food you have stashed - literally throw it in the garbage - and make this instead!

{Follow me on Instagram for more healthy recipe inspiration!}
Picture
Picture
Ingredients:
1/2 cup granulated sugar
1/2 cup water
1 heaping cup cubed watermelon
1/2 cup chopped strawberries
​fresh sliced strawberries for garnish, optional*

Directions:
Pour the sugar and water into a saucepan. Bring to a boil and stir until the sugar dissolves, to make a simple syrup. Remove from heat and set aside to cool. This makes about 2/3 of a cup.

In a blender, add the watermelon, strawberries and 1/2 cup of the simple syrup. Purée until smooth and refrigerate any leftover syrup in an airtight container for future use. Pour the purée into popsicle molds, garnish with a thin slice of fresh strawberry and freeze for at least 2 hours.

​Yield: 6-8 popsicles
Pin It
0 Comments

Chewy Chocolate Peanut Butter Bars

6/11/2017

0 Comments

 
Picture
If a Crappy-Wife-of-the-Year award exists, I just qualified.

My husband, who has an extra long sweet tooth, rarely complains when he opens his lunch cooler to find only a sandwich, apple and a yogurt. Even though we both know a homemade brownie or even a piece of chocolate would make his day much happier. Most days, he quietly accepts the lunch I pack for him. 


This idea for a granola bar has been swirling around in my head for awhile now. It contains all the flavor components that I know my husband likes. The best way of describing it might be peanut butter cup - meets rice krispie treat - meets peanut chew. A simple ingredient list with few steps, I can toss it together quickly and store it in the freezer for days when I can't quite find the time to restock my husband's favorite chocolatey desserts. 

I finally got around to making it for him the other day. Unfortunately, and unbeknownst to either of us, there was a mix up with my husband's scheduled colonoscopy. Instead of taking place in July as we both thought, he was expected bright and early the next morning. Which meant he could not eat a thing the day I made this new treat.

And to make matters worse, I made him critique these photos for the blog, while his stomach grumbled for the dinner he couldn't have.

Oy, bad wife!

On the bright side, my husband is now happily munching his way through the batch of bars. Apparently, he started sometime around midnight while I was fast asleep. When I awoke, it was to a cup of freshly made coffee and the comment "those bars are awesome - you need to make more!" Perhaps I'm not a completely crappy wife.

For my taste, these are sweet. I like to take a few bars and cut them into small squares for myself. Then I wrap them in parchment paper, tuck them into a container or small ziplock bag, and store them in the freezer until I have a craving. They thaw fairly quickly - in just 30-45 minutes they are soft enough to eat.

But for the rest of you chocolate peanut butter lovers, just pop them in the fridge for up to a week. Not that they'll last that long...
Picture
Picture
Ingredients:
1 cup rolled oats
1 cup unsalted peanuts, roughly chopped
1 cup semi-sweet chocolate chips
2 cups brown rice krispie cereal
1/4 cup coconut oil
1/4 cup peanut butter
1 cup brown rice syrup
1 tablespoon vanilla paste
pinch of salt

Directions:
Line an 8-inch square pan with parchment paper.

In a bowl, toss the oats, peanuts, chocolate chips and rice krispies until evenly combined. Set aside.

In a large saucepan, melt the oil, butter and syrup over medium-high heat, about 2-3 minutes, stirring frequently. Add the vanilla and salt. Remove from heat and fold in the cereal mixture with a rubber spatula. Tip: The chocolate chips will melt during this step, allowing the chocolate to be evenly distributed throughout the bars. Transfer the mixture to the lined pan and gently press into an even layer with the spatula. Refrigerate for at least 2 hours. Cut into even bars.

Storage:
1. Return the cut bars to the pan, cover with plastic wrap and refrigerate for up to 1 week.
2. Wrap each bar in parchment paper and stack in a container or ziplock bag. Freeze for up to 3 months.

​Yield: 8-10 bars
Pin It
0 Comments

Copycat Crispy Quinoa VegeFi Burgers

6/1/2017

9 Comments

 
Picture
**UPDATE**
I first shared this recipe back in October of 2015. Somehow, bad photography and all, it endures as one of my most visited blog posts to date. 

Since then, not only did I update the photographs to capture an actual view of the burger, I also tweaked the recipe and cleaned up the directions. To anyone who isn't much of a cook, the recipe might seem intimidating as written. There are a lot of ingredients in this one. But if you read through the directions and just focus one step at a time, it's not so bad. Not to mention that this makes a nice big batch that you can store until you next crave a VegeFi Burger. (Keep reading below for tips.)

Years ago during a culinary class, I remember the chef teaching us the key to a good copycat recipe. First, when not privy to the secrets of the authentic version, identify as many specific ingredients as possible through visuals and taste. (In other words, I had to examine and eat a LOT of VegeFi Burgers.) Then shift the focus to overall flavor, adding and subtracting ingredients to find what works. Be willing to make the item over and over, until a blind taste test can't detect any difference between the copycat and the original.

After much trial and error, I believe I have accomplished that here. 

One difference worth pointing out - the real VegeFi Burger is vegetarian-friendly only, not vegan, due to the additions of egg and cheese. With my version, a vegan person has the option to omit the cheeses without dramatically changing the flavor of the burger all that much - and egg is not at all a part of my ingredient list. Also, while the original burger is topped with the usual lettuce-tomato-onion, changing things up by omitting the tomato and swapping out the lettuce with purple kale is a tasty alternative. 

Another tip I neglected in my original post is how well these burgers freeze. Simply wrap in parchment paper and place in an airtight container or ziplock bag. Then defrost and bake at 400ºF in a toaster oven for 5-7 minutes per side.

OCTOBER 2015:
​
I feel lucky that, for the time being, I live just a five minute walk from local shops and restaurants. It's a nice feeling to have convenience packaged into a cute little town only steps away. When a new storefront opens, it's exciting because each one is unique. Just last year, my neighborhood acquired a new BurgerFi restaurant. A little more casual urban than some of the other establishments in the area, it quickly became popular with the local college crowd. 

I normally avoid processed fast food, but being new, I had to try it. For all of us health and fitness advocates out there, I'm sad to say...it was good. It was REALLY good. Then on about the fourth or fifth visit, I tried the Crispy Quinoa VegeFi Burger. WOW! I have never had a veggie burger quite like that. For me, it even beat their beef burgers. But while I admire BurgerFi's efforts to use quality, hormone and antibiotic-free ingredients, they are technically a fast food franchise. I tend to feel better not eating there too often. Particularly since their fries are so tempting. However, I really want that crispy quinoa burger in my regular rotation.

For those of us trying to embody fitness and nutrition while still enjoying decent food, here is my healthier copycat version. I won't go so far as to claim it's exactly like the authentic VegeFi burger. Or even as tasty. Though I doubt anyone will be disappointed after biting through the crunchy quinoa crust into the smooth saltiness of the burger, and the tangy remoulade sauce. 
Picture
Burger Patties:

Ingredients:


Burger Patties:
1 cup uncooked quinoa
1 cup uncooked small green lentils
extra virgin olive oil for cooking
salt and pepper to taste
1 medium onion, chopped
1 medium zucchini, shredded
2 medium carrots, shredded
12 baby bella mushrooms, finely minced
2 cups red wine
1 cup vegetable broth
4 sprigs fresh thyme
1/2 cup freshly grated Parmesan cheese, optional
1/2 cup freshly grated Fontina cheese, optional
2 cups plain panko breadcrumbs

Toppings:
​8 slices white cheddar cheese, optional
8 multigrain or sesame rolls, toasted, 
1 medium red onion, sliced thin
8 slices tomato
1 cup lettuce or purple kale leaves, shredded
1 cup vegetarian remoulade sauce, see recipe below**

Directions:
In a medium-size saucepan, bring 2 1/2 cups of water to a boil. Add the lentils, turn heat to low and cover. Cook for 35 minutes, or until lentils are soft and water is absorbed. Meanwhile, in a separate saucepan, bring 2 cups of water to a boil. Rinse the quinoa before adding to the boiling water. Turn heat to low, cover and cook for 15-20 minutes until the water is completely absorbed. Set the quinoa and lentils aside to cool.

In a sauté pan, heat the 2 tablespoons of oil on medium and add the onion. Stir in a pinch of salt and pepper. Cook until caramelized, about 15-20 minutes, stirring frequently. Add the zucchini, carrot and mushrooms. Continue cooking until softened, giving it the occasional stir. Add another pinch of salt and pepper to taste. Remove from heat and transfer the vegetables to a mixing bowl to cool.

Pour the wine and broth into the same sauté pan, add the thyme and bring to a slow rolling boil. Cook until reduced to 1/3 of a cup. Add the wine reduction, and the grated cheeses if using, to the vegetable mixture. Then stir in 2 cups of cooked lentils, 2 cups of cooked quinoa and the breadcrumbs. Transfer half of the mixture into a blender and puree. Spoon the puree back into the mixing bowl, and stir until evenly combined.

Pour the remaining cooked quinoa onto a cookie sheet. Use a rubber spatula to spread it into a thin layer. Form the vegetable mixture into 8 patties. Firmly press each patty onto the cooked quinoa layer. Flip the patties over and repeat. Then, gently press the palm of your hand around the edges and over the sides of each patty to ensure that the quinoa completely coats the patties in a thin layer. Brush off any excess.

Clean the sauté pan, heat the olive oil over medium high heat and cook the patties in small batches, 3-5 minutes per side. Use a thin spatula to gently flip the patties. When both sides are golden brown, add a slice of cheese if using, and cover the pan until the cheese melts. Transfer patties onto toasted rolls. Top with red onion, tomato, lettuce and remoulade sauce. 

Vegetarian/Regular Remoulade Sauce:
​
Ingredients:

1 cup vegan or regular mayonnaise
1 teaspoon onion powder
1 teaspoon garlic powder
1 teaspoon sweet relish
1 teaspoon Worcestershire Sauce
1 teaspoon Valentina mild hot sauce
1 teaspoon horseradish sauce, or 1/4 teaspoon plain horseradish
2 tablespoons fresh lemon juice
2 tablespoons chopped fresh parsley
6 chives, finely minced
salt and pepper to taste

Directions:
Whisk all ingredients together in a bowl. Chill until ready to serve.

Yield: 8 burgers

Pin It
9 Comments
    Fitness Training:
    Located in the Hudson Valley or Westchester NY? Contact me for a trial in-home fitness training session!

    Author

    Sarah Inglis is a increasingly vegetarian non-vegetarian, as well as a certified fitness trainer, personal chef, freelance writer and food photographer with degrees in media communications and dietetics. This blog is a collection of healthy recipes, along with a bit of fitness & nutritional information.

    Links

    Affiliate links to products I use and think are great are posted on this site. This means I receive a small commission if you purchase a product through these links, though at no extra cost to you. This is both to cover costs for the blog and to provide helpful tools to the reader. Thank you for supporting Embody Fitness & Nutrition!

    Categories

    All
    Appetizers
    Breakfast
    Burgers/Sandwiches/Tacos
    Desserts
    Entrees
    Fitness Info
    Juice Recipes
    Nutritional Info
    Salad
    Sides
    Snacks
    Soup
    Toppings
    Travel

    Archives

    January 2018
    December 2017
    September 2017
    August 2017
    July 2017
    June 2017
    May 2017
    April 2017
    March 2017
    February 2017
    January 2017
    December 2016
    November 2016
    October 2016
    September 2016
    August 2016
    June 2016
    May 2016
    April 2016
    March 2016
    February 2016
    January 2016
    December 2015
    November 2015
    October 2015
    September 2015
    July 2015
    June 2015
    May 2015
    April 2015
    March 2015

    RSS Feed

© 2015-2018 Embody Fitness & Nutrition. All rights reserved. No content or images may be reproduced in any part or form without written permission.
Proudly powered by Weebly