Embody Fitness & Nutrition
  • Blog
  • Recipe Index
  • Cooking Videos
  • About Me
    • Additional FAQ's
    • Published Work
  • Contact

Spicy Winter Vegetable Soup

1/24/2018

0 Comments

 
Picture
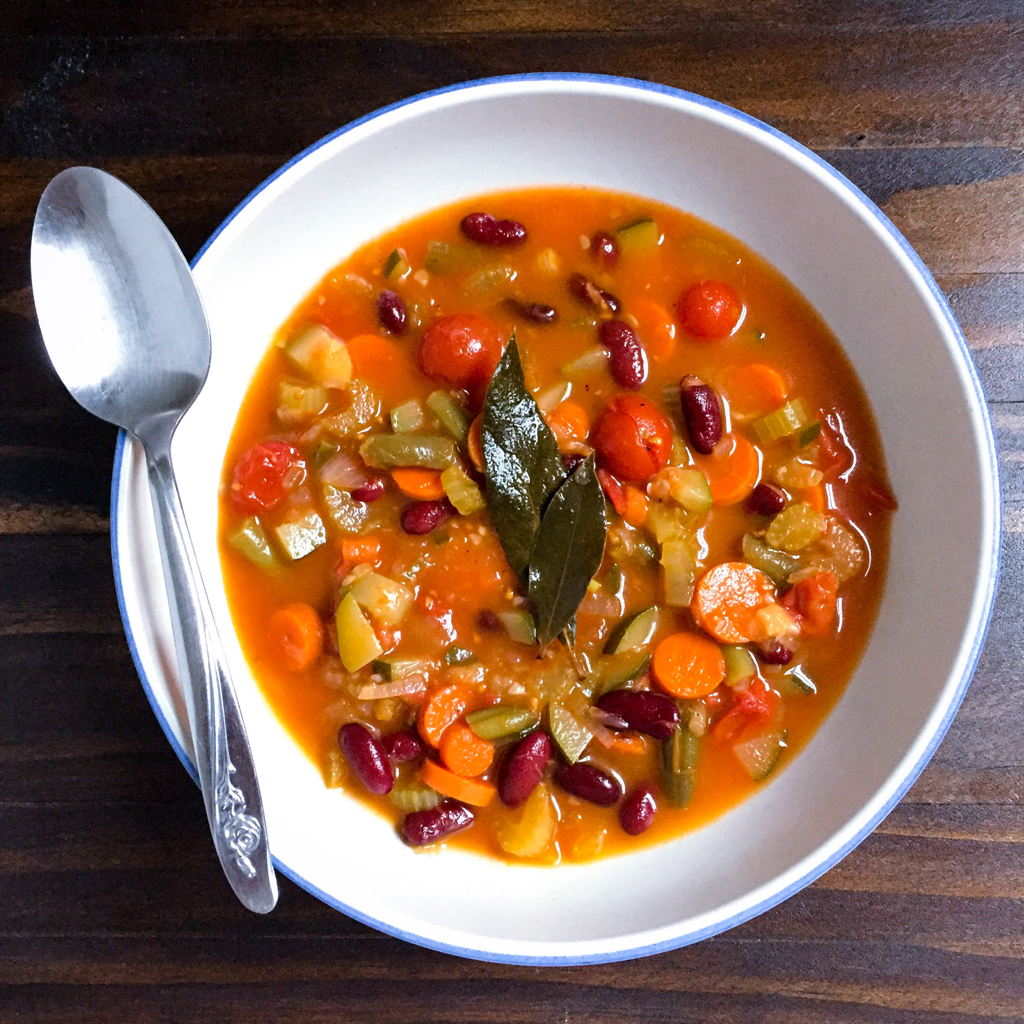
This spicy winter vegetable soup is a healthier pasta-free take on minestrone with a few changes. In addition to eliminating the pasta, the usual herbs (thyme, oregano, basil) have been replaced with bay leaves and green chilies.

All of the vegetables can be purchased frozen, or pre-chopped in the produce section of a grocery store - making it extremely easy for a beginner cook. Once prepared, the soup can be stored in the freezer. Even if frozen vegetables are used make it - it’s a fallacy that previously frozen foods can’t be refrozen. The photo above was taken post thaw-out and reheat. As you can see it holds up well.

​The spicy kick opens the nasal passages by constricting the blood vessels, providing temporary relief for anyone suffering from nasal congestion. Of course, you can decide what level of heat to add.

Vegetables help boost immunity and keep the winter weight gain to a minimum. Add this soup to your weekly rotation and start prepping your spring wardrobe...it’s only 54 days away. Woohoo!

Ingredients:
1 onion, chopped
3 celery sticks, chopped
3 carrots, chopped
1 small to medium zucchini, chopped
1 cup green or waxed beans, chopped
1 15-oz can tomatoes with green chilies
1 15-oz can kidney beans, drained and rinced
2 bay leaves
4 cups broth
salt and pepper to taste

​Yield: 4-6 servings
0 Comments

10-Minute Ramen Noodle Soup

12/2/2017

0 Comments

 
Picture
After a solid two months of neglect, I am finally truly motivated to blog again. During my hiatus, a lot of time was spent on the Harlem Valley Bike Trail in Upstate New York. In addition to being closely situated to my home, I found it to be the most scenic trail of those I have visited in the Hudson Valley.

Winding 10 miles through farmland near the NY/Connecticut border, the trail ends in the small country town of Millerton, NY. There you can grab a local coffee and visit a surprising number of restaurants/shops such as Harney's Tea Room, Oblong Books & Music and 52 Main to name a few. Scroll down to enjoy some of the scenery en route.

Now that the leaves have fallen and the temperature is finally dropping to normal seasonal levels, the bikes are in hibernation and kitchen is calling. My husband and I love ramen noodle soup on a cold day, but we have long given up the pre-packaged variety. My version is packed with flavor and nutrients, taking about 10 minutes to make - a relief during this busy cookie baking~holiday shopping~very demanding job time of year!
Picture
Picture
Picture
Picture
Picture
Ingredients:
16 oz package frozen stir fry mixed vegetables
3 cups vegetable or chicken broth + 1 cup reserved
4 tablespoons soy sauce
2-3 tablespoons mirin
1 teaspoon freshly grated ginger
10 oz. package lo-mein egg noodles
2 green onions, roughly chopped

Directions:
In a medium sauce pan, heat the vegetables, broth, soy sauce, mirin and ginger over medium-high heat. Cook until the vegetables have thawed, about 3 minutes. Add the noodles and cook for another 4 minutes (see tip 1). Before the noodles absorb most of the broth, add the reserved broth. Remove from heat and divide into serving bowls. Add any additional ingredients (see tip 2). Garnish with green onions.

Tips:
1. The noodles I use are egg-white only lo-mein noodles from the Asian aisle in my regular grocery store. If quick cooking noodles are unavailable, cook the noodles separately and add them to the soup just before serving.
2. Any frozen vegetables or meats can be substituted for the stir fry mix. Try zucchini, edamame, mushrooms, snap peas, carrots, sliced chicken or pork - whatever you have on hand!

Yield: 4 servings

Pin It
0 Comments

Cannellini, Zucchini & Tomato Salad

9/12/2017

0 Comments

 
Picture
Confession: I have not been in the least bit motivated to blog this past month.

Largely because I was burnt out trying to accommodate my husband's new vegetarian diet. He has since brought chicken back into the rotation, mostly because completely eliminating meat did not make a noticeable difference in how he felt. The good that came from it was his openness to cutting out all red meat, while learning to enjoy a few new fruits and vegetables that he would normally never touch.

It also built in him more of an awareness of the toxicity in products that are marketed as safe to use. In fact he taught me something - did you know that, like chemicals in plastic, aluminum leeches into food when exposed to high temperatures? Small amounts are not harmful, but at high levels, aluminum can cause brittle bones, heart disease and iron deficiency, while also being linked to diseases of the nervous system such as dementia and Alzheimer's.

Second confession: I could have been blogging, but instead spent my time on newly acquired hobbies.

After talking about it forever, we finally picked up some bikes, hitting the local trails whenever possible. We bike an average of 16-23 miles per trip. Just about all my legs can handle at this point because, as with everything, my husband and I run on two different speeds. I maintain a decent athletic clip on the first leg of the trail, knowing that I'll be racing to keep pace on the return. Whereas my husband sets his speedometer to "haul ass," slowing down only to eat or get back in the truck to head home.

The eating part of the bike ride is what got me back to this blog. I love picnics. With so many vegetables coming in from my garden, and the weather still reasonably warm, salads are not yet off the menu. This recipe right here is one of my favorites from one of our recent outings. Bon appetit!
Picture
Ingredients:
olive oil
1/4 large red onion, thinly sliced
1 small zucchini, diced
1 can cannellini beans
salt and pepper to taste
10-12 cherry tomatoes, halved
1 tablespoon fresh oregano or parsley, minced
1 tablespoon freshly squeezed lemon juice, optional*
3 tablespoons feta cheese

Directions:
Heat the oil in a fry pan over medium-high. Add the onions and zucchini, sauting for 2-3 minutes, until softened. Stir in the beans, salt and pepper, cooking for another minute. Remove from heat and transfer to a serving bowl to cool.

Once the sauteed vegetables have cooled toss in the tomatoes and herbs. Add the lemon juice if using. Sprinkle the cheese over the top and serve.

Yield: 4-6 servings
Pin It
0 Comments

Purple Potato Salad with Lemon Vinaigrette

8/10/2017

0 Comments

 
Picture
For the past couple of weeks a cold has all but killed my sense of taste and smell. A problem when trying to ensure that the recipes I post are better than edible. With the heatwave we had, I was happy enough subsisting on iced tea and watermelon anyway. So while waiting for my cold to pass, my attention turned to other summer projects:
  • the creation of two flower beds for the front of my house, which for all my inexperience at landscaping, turned out pretty well.
  • weekends exploring the local bike trails when my husband was not too busy being sick with his own cold. Turns out we've moved to a mountain biking mecca here in Upstate New York - who knew! We'll be sticking to the paved path however.
  • an excellent summer read called "Il Bel Centro: A Year in the Beautiful Center" - a real account by author Michelle Damiani as she and her family embarked on a year abroad in the small town of Spello, set within the Umbria region of Italy. A book geared towards foodies, this is a great read for anyone finding themselves this far within a food blog post:
Not that my kitchen sat collecting dust while I got over my summer cold. My husband still had to eat. Unfortunately, we recently watched a trending documentary called "What The Health" on Netflix, which turned my already extra finicky husband off meat and onto the idea of a plant-based diet.

He distrusts most vegetables, so how this works out remains to be seen.

From a financial standpoint, I'm happy. The cost of meat is ridiculous. But understand that this is a guy who lives on burgers, hot dogs and breaded chicken. Anything green is questioned and pushed around the plate repeatedly before cautiously arriving at his mouth. 

My new challenge is to cook him healthy vegetarian dinners that do not taste, and I quote, "too vegetably." No need to look that one up - it isn't a word. If anyone has any suggestions or ideas on this topic - moms with picky children perhaps because that is essentially what I am dealing with - I am happy to hear them. Unlike him, I'm not content to let him live on pasta, peas and carrots for the rest of his life.

A vegetable my husband will definitely eat are purple potatoes. They taste just like any other potato and are more readily available in major supermarkets than ever before. Nutritionally, purple potatoes have a little more going on than their white counterparts with the presence of pigmented anthocyanins, which have been linked to disease prevention. They also make a wonderfully colorful potato salad.

Rather than mayonnaise, I use simple vinaigrettes to dress all of my salads. These are easy for even the most inexperienced cook to whisk up, and require only a handful of ingredients that most people already have: oil, an acid, salt and pepper. That's the base. Toss in herbs, flavored mustards, peaches, berries, avocados, or sweeteners such as local honey or agave to add other flavor profiles.

​Most traditional potato salads include hardboiled eggs as I have here. Sometimes I swap avocado or white beans in their place. Or in the case of my husband, l just leave the eggs out all together. 

This particular bowl of potato salad is all mine though. Lunch can't come fast enough!
Picture
Ingredients:

Lemon Vinaigrette:
3 tablespoons extra virgin olive oil
2 tablespoons fresh squeezed lemon juice
1 teaspoon honey
salt and pepper to taste

Salad:
1 pound purple potatoes, cubed
2 tablespoons olive oil
1/2 medium red onion, sliced thin
1/3 cup frozen peas
salt and pepper to taste
2 hardboiled eggs, chopped
1 tablespoon fresh flat leaf parsley, finely chopped
1/4 cup lemon vinaigrette
​
Directions:
In a bowl, whisk the oil, lemon juice, honey, salt and pepper. Set aside.

In a 3-4 quart pot, cover the potatoes with water and bring to a boil over medium-high heat. Cook until fork tender, about 5-7 minutes. Remove from heat and pour the potatoes into a strainer.

In the same pot, heat the oil and add the onions. Cook until soft and translucent, about 5 minutes. Stir in the peas to thaw, season with salt and pepper, then remove from heat. Gently fold in the potatoes, eggs and parsley. Transfer to a serving dish and drizzle with the reserved vinaigrette.

Yield: 4 servings
Pin It
0 Comments

Prickly Pear Limeade Popsicles

7/21/2017

0 Comments

 
Picture
Ever tasted a prickly pear? Me neither. Not until recently. Even during my three trips to Mexico, where prickly pears (called nopales in Spanish) are all over the place, it never occurred to me to try one.

Prickly pears really are part of a cactus plant. They come in a rainbow of colors from orange, yellow and green to fuchsia and even red. The exterior is a bit unappealing, as one might expect from a cactus fruit, and the skin is inedible. The seeds within the fruit will break a tooth, and are best extracted. 

From a nutritional standpoint, prickly pears are loaded with Vitamin C, magnesium, potassium, B-vitamins, calcium, copper and antioxidant compounds.


When I finally got around to eating a prickly pear for the first time, I was filled with uncertainty over how I could make it work in a recipe. The color was fantastic, just look at that deep pink hue in the photos. But it was like eating a sweet beet. And I like beets! But this was...earthy. Not the flavor I normally look for in a dessert, or a fruit for that matter! Hoping to balance that earthiness, I tried heightening the sweetness factor. I achieved the best results when using orange and lime juices combined with raspberries. Simple syrup in place of the orange juice and other berry varieties also work well.

Even with these added ingredients, the unique prickly pear flavor is distinct, particularly on the first bite. But in a "hmm, this is interesting" kind of way. After the second and third bites, the flavors blend a bit more and you wind up thinking "wow, this is really good!"

If you have yet to try a prickly pear yourself, I encourage you to pick a few up. They are available in both North and Latin America. Summer (now!) is your best bet for locating them in the States. 
​
{Follow me on Instagram for more healthy recipe inspiration!}
Picture
Ingredients:

Popsicles:
3 medium size prickly pears
3/4 cup fresh berries of choice
juice of 1 lime
1/2 cup orange juice or 1/2 cup simple syrup**

**Simple Syrup:
1/2 cup water

1/2 cup granulated sugar

Directions:
Add the water and sugar to a saucepan and bring to a boil over medium-high heat, stirring until the sugar dissolves. Remove from heat and allow the syrup to cool. 

Slice off both ends of the pears, then cut each pear in half. Peel the skin off of each halve and place the pulp in a blender. Add the berries. Puree until smooth, then pour into a mesh sieve lined bowl. Use the back of a spoon to stir and press the pulp through the sieve. Stir in the lime and orange juices, or simple syrup if using. Pour into the popsicle molds, freezing for at least 2 hours.

Yield: 4-6 popsicles
Pin It
0 Comments

Shrimp Noodle Bowl

7/16/2017

0 Comments

 
Picture
Twice in the past week, I bought an ingredient thinking it was one thing and found out after I got it home that it wasn't at all what I thought I was buying.

Is this what happens at 40 - your brain starts the slow fry into old age and you catch yourself doing things you never used to do?

Take the noodles in this recipe. I thought they were soba, made of gluten free buckwheat flour and visibly darker than regular noodles. What I actually bought were lo mein noodles blended from egg whites, wheat and soy flours.

Fortunately noodles are like the color black, they go with anything. Good news, because I threw in something a little unusual for an asian noodle dish - beets. See the gold nuggets in the above photo? Those are golden beets. Unlike their red counterparts, these guys do not bleed color all over the place which makes them great for adding to whatever dish you like. They are also easy to cook - just peel, wrap in foil and roast at 350ºF for an hour.

In fact, the beets are the only thing about this recipe that take any time at all and can be prepared ahead of time. The noodles cook in 4 minutes, the vegetables just slightly longer and the sauce is equally quick and easy. In other words, this is the perfect asian summer noodle dish when the stove is the last place you want to be.

{Follow me on Instagram for more healthy recipe inspiration!}
Picture
Ingredients:
4 ounces soba or lo mein noodles
olive oil
1/2 lb. shrimp, peeled and deveined
5 medium baby bella mushrooms, chopped
1 scallion, chopped, green ends reserved
1 teaspoon grated fresh ginger
2 cloves garlic, minced
3 tablespoons tamari or soy sauce
1 tablespoon tahini
3 tablespoons water
2 cooked golden beets, diced

Directions:
Bring a pot of water to a boil and add the noodles. Cook for 4 minutes, or according to package directions. Drain and set aside.

In a saucepan, heat 2 tablespoons of oil over medium-high. Add the shrimp and cook 2-3 minutes on both sides. Transfer to a dish and set aside. Add another tablespoon of oil and cook the mushrooms until golden brown, stirring frequently, for about 5 minutes. Stir in the white portion of the scallion, ginger, garlic, tamari (or soy) sauce and tahini. Add the water to thin out the sauce. Continue cooking for another 2-3 minutes. Remove from heat and toss with the cooked noodles. Add the beets and the reserved scallion greens. Serve immediately.

Yield: 2 servings
Pin It
0 Comments

Everything Waffle Hash Browns

7/7/2017

0 Comments

 
Picture
Since nabbing a jar of Everything Bagel Seasoning at Trader Joe's, I've been having a blast sprinkling it all over the place:
  • everything seasoned egg salad, (undecided)
  • everything seasoned rice (weird but not half bad),
  • everything seasoned avocado toast (who hasn't done this)
  • everything seasoned ham and grits (YUM)

My conclusion is that if it isn't sweet and it tastes good with butter, then it probably pairs well with everything bagel seasoning. 

Which brings me to this recipe for Everything Waffle Hash Browns. Nothing against bagels, but I always try to start my day with more nutritive value. Potatoes, despite having a bad reputation for being an evil "white carb," are very health friendly. Kind of like coffee, potatoes are only as bad as what you add to them. More than that, the skins are rich in nutrients such as:
  • potassium, which normalizes blood pressure, the heartbeat, and muscle contractions
  • Vitamin C, boosting the immune system and warding off summer colds
  • Vitamin B6, an essential vitamin in the metabolism of protein

Making waffle hash browns is pretty easy if a few simple rules are followed. First, an even coating of oil is essential to preventing a mess stuck to your waffle iron. Not spritzed, not saturated, just a medium-thin layer of oil. Second, let the potatoes cook for the full 12-15 minutes if you want just that, cooked hash browns. Third, be gentle and patient while trying to dislodge it from the iron. No matter how much oil you use, invariably some of the potatoes will stick, requiring gentle prodding to loosen and remove the hash brown without it crumbling into a disaster. Tongs seem to work best in this instance. Fourth, don't worry about perfection. As you can see in the photos, my hash browns are imperfectly round but still presentable.

As for toppings, you could literally use any ingredient normally added to a bagel. Or go the poached egg route with a splash of hot sauce - that one gets my vote!

​Happy weekend to you all!

{Follow me on Instagram for more healthy recipe inspiration!}
Picture
Ingredients:
cooking spray
4 medium russet potatoes
4 teaspoons everything bagel seasoning

Directions:
Generously spray both sides of a waffle iron with the oil. Turn the iron to medium high, close the lid and allow it to come to temperature.

Grate the potatoes using a cheese grater or a food processor, leaving the skins on. Place the grated potatoes in a bowl and cover with cold water. Allow to sit for several minutes. Drain the potatoes by pouring into a mesh metal strainer. Set the strainer over the bowl, and squeeze out any excess water. Empty the water, then return the potatoes to the bowl. Toss with the seasoning. 

Spoon a quarter of the potato mixture onto the waffle iron, and spread into an even layer. Close the waffle iron and allow to cook for 12-15 minutes, or until the top turns golden brown and crispy. Turn off the waffle iron. Use a pair of tongs to gently lift and loosen the edges of the hash brown, before sliding onto a plate. Repeat with the remaining potato mixture.

Top with a poached egg or condiment of choice.

Yield: 4 servings
Pin It
0 Comments

Italian Cauliflower Crusted Chicken

6/19/2017

2 Comments

 
Picture
Unintentionally, a paleo recipe found its way onto the blog. 

Perhaps because my husband and I shared between us an entire round of sourdough bread, among other things, in celebration of his birthday yesterday afternoon. I love bread and carbs in general, but I am so over it all right now. 

Another blog post titled, Lemon Pepper Turkey Meatballs & Quinoa Stir Fry, got me thinking about other ways to replace traditional bread products with vegetables. Turns out cauliflower works extremely well as a crust for chicken. The trick is to dip the chicken in egg wash, finely mince or "rice" the cauliflower and then firmly pack it onto the meat. From there it bakes up beautifully.

In the recipe below, yellow cauliflower is listed in the ingredients. Any color will do, but the yellow variety is much more visually appealing and comparable to authentic breaded chicken (useful when trying to coax a family member into eating healthier).

It also contains even more nutritional value than plain old white cauliflower, with high levels of beta carotene that the body converts to Vitamin A. Healthy cell growth within the eyes, skin, and organs is bolstered by Vitamin A. Not to mention that cauliflower is also packed with:
  • Vitamin C when eaten shortly after harvest, which assists with iron absorption,
  • Vitamin K, promoting blood clotting and containing anti-inflammatory properties, 
  • Cancer fighting phytochemicals helping to detoxify the body of free radicals,
  • A variety of vitamins and minerals in smaller quantities, that promote overall health and contribute to normal fetal development in pregnant women.

Most importantly, this recipe tastes pretty close to regular breaded chicken. It may not be quite as crispy, but it will work in any dish where breaded chicken is used. Scout's honor!

{Follow me on Instagram for more healthy recipe inspiration!}
Picture
Picture
Ingredients:
extra virgin olive oil
​2 cups finely minced yellow cauliflower 
1 teaspoon dried oregano
1 teaspoon dried basil
1 teaspoon onion powder
1 teaspoon garlic powder
1/4 teaspoon salt
1/4 teaspoon freshly ground black pepper
2 large eggs
1 tablespoon milk of choice
2 boneless chicken breasts, halved lengthwise

Directions:
Pre-heat the oven to 375ºF. Line a sheet pan with foil and drizzle with olive oil.

Stir together the cauliflower, oregano, basil, onion and garlic powders, salt and pepper. Pour half of the mixture onto a large plate and set aside.

Whisk the eggs and milk in a shallow pan. Dip each chicken breast into the egg wash, then place onto the plate of cauliflower. Firmly press several tablespoons of the cauliflower onto the exposed side of the chicken breast, then flip over and repeat until the entire surface of the chicken is coated. Place onto the sheet pan and repeat with the remaining chicken breasts.

Bake for 40 minutes or until the juices run clear and the crust is lightly browned.

Yield: 4 servings
Pin It
2 Comments

Strawberry Watermelon Sorbet Pops

6/15/2017

0 Comments

 
Picture
A slice of summer has finally arrived!

Over the last few days the air has turned hot and heavy with moisture. My fitness clients have been doggedly trudging through their workouts despite the heat - drenched almost to the tips of their ponytails by the end.

In this weather, anyone with a diet not on point is quickly revealed - heat tends to cause extra water retention and bloating. In just 1-3 days, a person who enjoys a few too many processed foods or late night snacks becomes visibly pudgier around their mid-section, as the temperature rises. For a trainer, this is useful information because it tells me when a person is in need of some gentle nutritional nudging.

Personally I crave, and therefore choose, watery fresh fruit over processed crap when it's hot. I suggest others do the same, but I often hear that fruit does not do enough to satisfy their sweet tooth. This is where turning it into a simple frozen dessert can help.

Smoothies blended with frozen fruits, plus a 1:1 ratio of coconut water and orange juice for a bit of sweetness, can hit the spot. Another trick is to blend frozen fruits with unsweetened nut or soy milk and a tablespoon of jam for that extra sweet kick.

Fresh fruits can be turned into sorbet-like popsicles. With watery fruits like melon and berries, the trick to preventing a solid "rock-sicle" effect, is to add a small amount of simple syrup. This ingredient is generally not necessary when using pulpy fruits such as mango, pineapple or bananas, which also have higher concentrations of sugar.

To kick off the season and motivate you all to start making your own healthy treats, I'm posting a very basic recipe. No veggies, herbs or strange ingredients in today's post.

If popsicle molds are not among your kitchen gadgets, just pour the purée into freezable serving glasses or a container. When ready to use, allow it to sit for a minute at room temperature before scooping it out.
​
​Go ahead and bookmark this recipe! The next time you find yourself suffering from a post indulgence puffy tummy, toss out the ice cream and any other junk food you have stashed - literally throw it in the garbage - and make this instead!

{Follow me on Instagram for more healthy recipe inspiration!}
Picture
Picture
Ingredients:
1/2 cup granulated sugar
1/2 cup water
1 heaping cup cubed watermelon
1/2 cup chopped strawberries
​fresh sliced strawberries for garnish, optional*

Directions:
Pour the sugar and water into a saucepan. Bring to a boil and stir until the sugar dissolves, to make a simple syrup. Remove from heat and set aside to cool. This makes about 2/3 of a cup.

In a blender, add the watermelon, strawberries and 1/2 cup of the simple syrup. Purée until smooth and refrigerate any leftover syrup in an airtight container for future use. Pour the purée into popsicle molds, garnish with a thin slice of fresh strawberry and freeze for at least 2 hours.

​Yield: 6-8 popsicles
Pin It
0 Comments

Chewy Chocolate Peanut Butter Bars

6/11/2017

0 Comments

 
Picture
If a Crappy-Wife-of-the-Year award exists, I just qualified.

My husband, who has an extra long sweet tooth, rarely complains when he opens his lunch cooler to find only a sandwich, apple and a yogurt. Even though we both know a homemade brownie or even a piece of chocolate would make his day much happier. Most days, he quietly accepts the lunch I pack for him. 


This idea for a granola bar has been swirling around in my head for awhile now. It contains all the flavor components that I know my husband likes. The best way of describing it might be peanut butter cup - meets rice krispie treat - meets peanut chew. A simple ingredient list with few steps, I can toss it together quickly and store it in the freezer for days when I can't quite find the time to restock my husband's favorite chocolatey desserts. 

I finally got around to making it for him the other day. Unfortunately, and unbeknownst to either of us, there was a mix up with my husband's scheduled colonoscopy. Instead of taking place in July as we both thought, he was expected bright and early the next morning. Which meant he could not eat a thing the day I made this new treat.

And to make matters worse, I made him critique these photos for the blog, while his stomach grumbled for the dinner he couldn't have.

Oy, bad wife!

On the bright side, my husband is now happily munching his way through the batch of bars. Apparently, he started sometime around midnight while I was fast asleep. When I awoke, it was to a cup of freshly made coffee and the comment "those bars are awesome - you need to make more!" Perhaps I'm not a completely crappy wife.

For my taste, these are sweet. I like to take a few bars and cut them into small squares for myself. Then I wrap them in parchment paper, tuck them into a container or small ziplock bag, and store them in the freezer until I have a craving. They thaw fairly quickly - in just 30-45 minutes they are soft enough to eat.

But for the rest of you chocolate peanut butter lovers, just pop them in the fridge for up to a week. Not that they'll last that long...
Picture
Picture
Ingredients:
1 cup rolled oats
1 cup unsalted peanuts, roughly chopped
1 cup semi-sweet chocolate chips
2 cups brown rice krispie cereal
1/4 cup coconut oil
1/4 cup peanut butter
1 cup brown rice syrup
1 tablespoon vanilla paste
pinch of salt

Directions:
Line an 8-inch square pan with parchment paper.

In a bowl, toss the oats, peanuts, chocolate chips and rice krispies until evenly combined. Set aside.

In a large saucepan, melt the oil, butter and syrup over medium-high heat, about 2-3 minutes, stirring frequently. Add the vanilla and salt. Remove from heat and fold in the cereal mixture with a rubber spatula. Tip: The chocolate chips will melt during this step, allowing the chocolate to be evenly distributed throughout the bars. Transfer the mixture to the lined pan and gently press into an even layer with the spatula. Refrigerate for at least 2 hours. Cut into even bars.

Storage:
1. Return the cut bars to the pan, cover with plastic wrap and refrigerate for up to 1 week.
2. Wrap each bar in parchment paper and stack in a container or ziplock bag. Freeze for up to 3 months.

​Yield: 8-10 bars
Pin It
0 Comments
<<Previous
    Fitness Training:
    Located in the Hudson Valley or Westchester NY? Contact me for a trial in-home fitness training session!

    Author

    Sarah Inglis is a increasingly vegetarian non-vegetarian, as well as a certified fitness trainer, personal chef, freelance writer and food photographer with degrees in media communications and dietetics. This blog is a collection of healthy recipes, along with a bit of fitness & nutritional information.

    Links

    Affiliate links to products I use and think are great are posted on this site. This means I receive a small commission if you purchase a product through these links, though at no extra cost to you. This is both to cover costs for the blog and to provide helpful tools to the reader. Thank you for supporting Embody Fitness & Nutrition!

    Categories

    All
    Appetizers
    Breakfast
    Burgers/Sandwiches/Tacos
    Desserts
    Entrees
    Fitness Info
    Juice Recipes
    Nutritional Info
    Salad
    Sides
    Snacks
    Soup
    Toppings
    Travel

    Archives

    January 2018
    December 2017
    September 2017
    August 2017
    July 2017
    June 2017
    May 2017
    April 2017
    March 2017
    February 2017
    January 2017
    December 2016
    November 2016
    October 2016
    September 2016
    August 2016
    June 2016
    May 2016
    April 2016
    March 2016
    February 2016
    January 2016
    December 2015
    November 2015
    October 2015
    September 2015
    July 2015
    June 2015
    May 2015
    April 2015
    March 2015

    RSS Feed

© 2015-2018 Embody Fitness & Nutrition. All rights reserved. No content or images may be reproduced in any part or form without written permission.
Proudly powered by Weebly