Embody Fitness & Nutrition
  • Blog
  • Recipe Index
  • Cooking Videos
  • About Me
    • Additional FAQ's
    • Published Work
  • Contact

Vegetable & Pesto Au Gratin

4/14/2017

0 Comments

 
Picture
While everyone else is all about chocolate bunnies and Easter eggs, this weekend I'm thinking about the vegetable situation. Mainly, what to do for a side dish when the family gets together. 

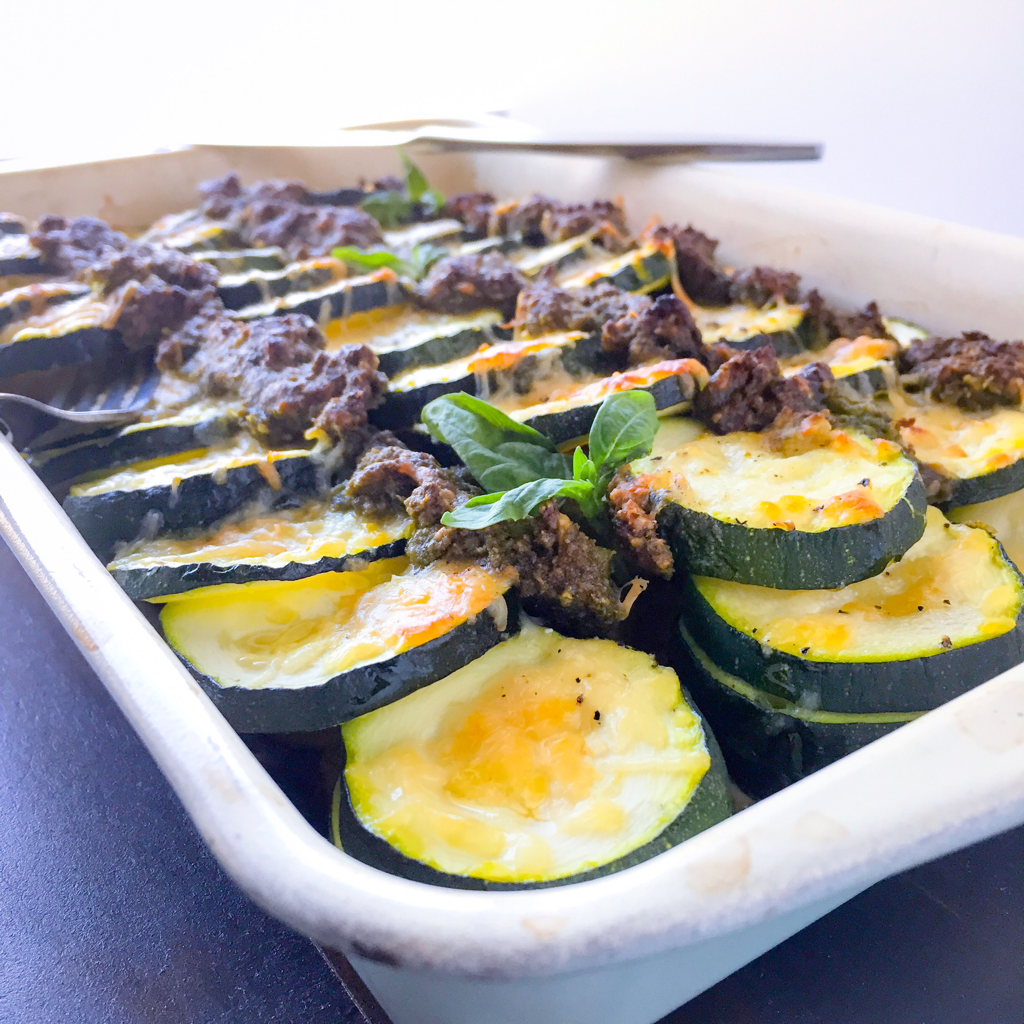
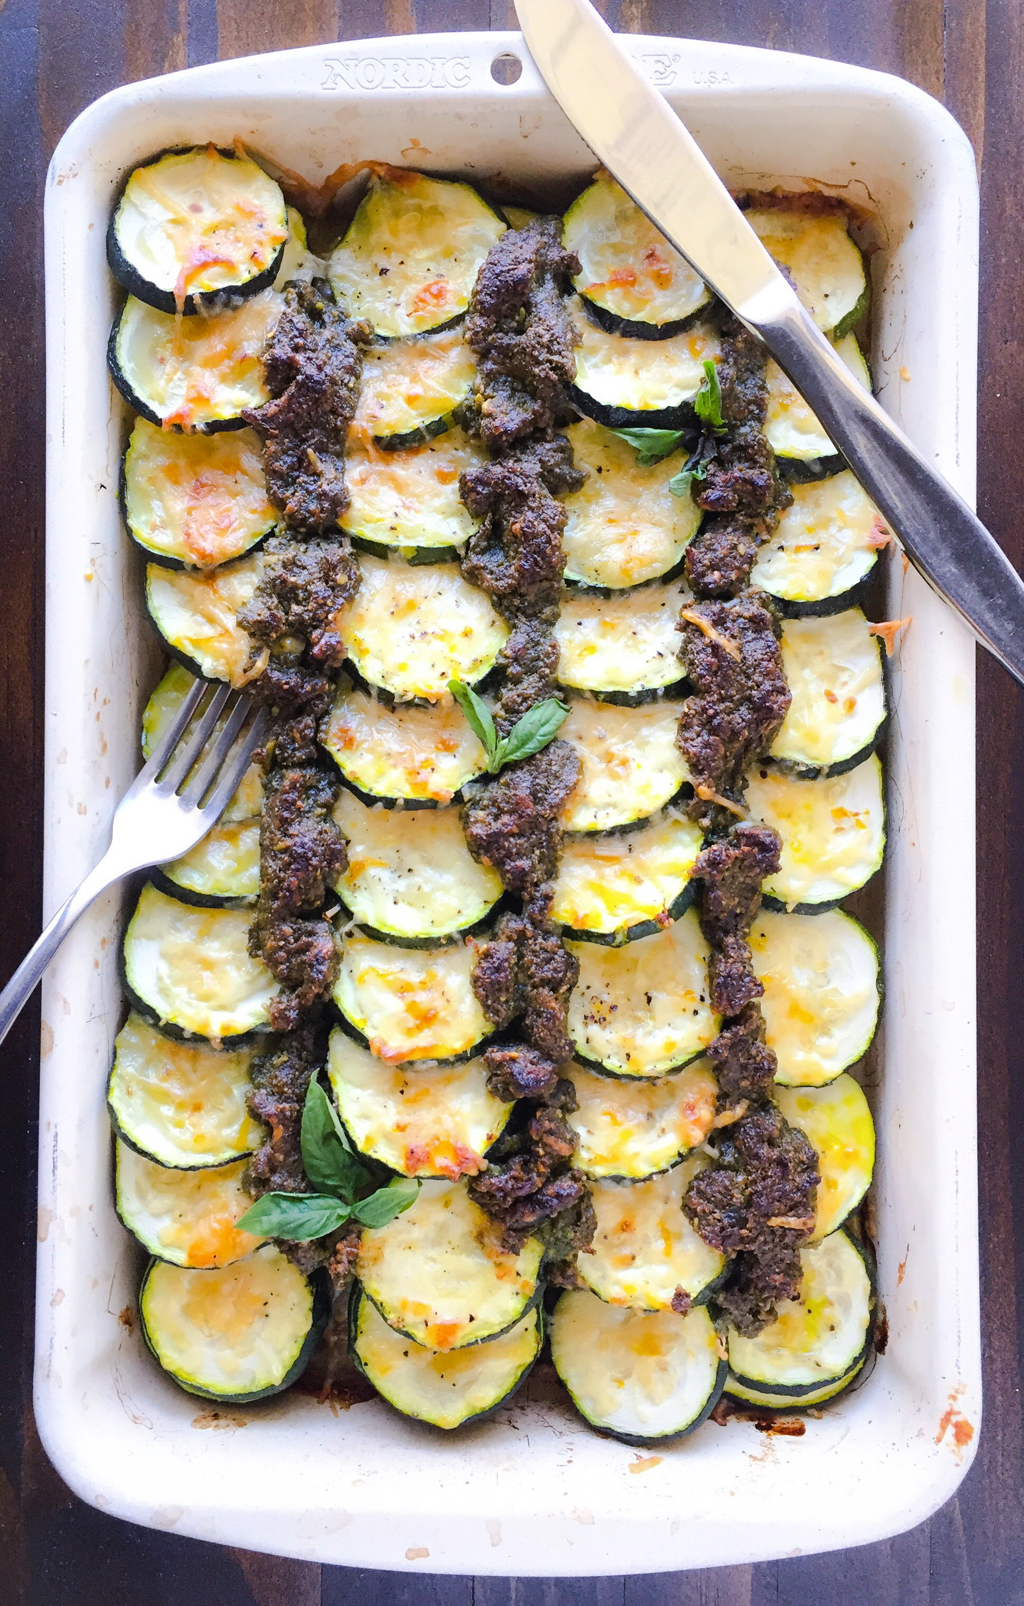
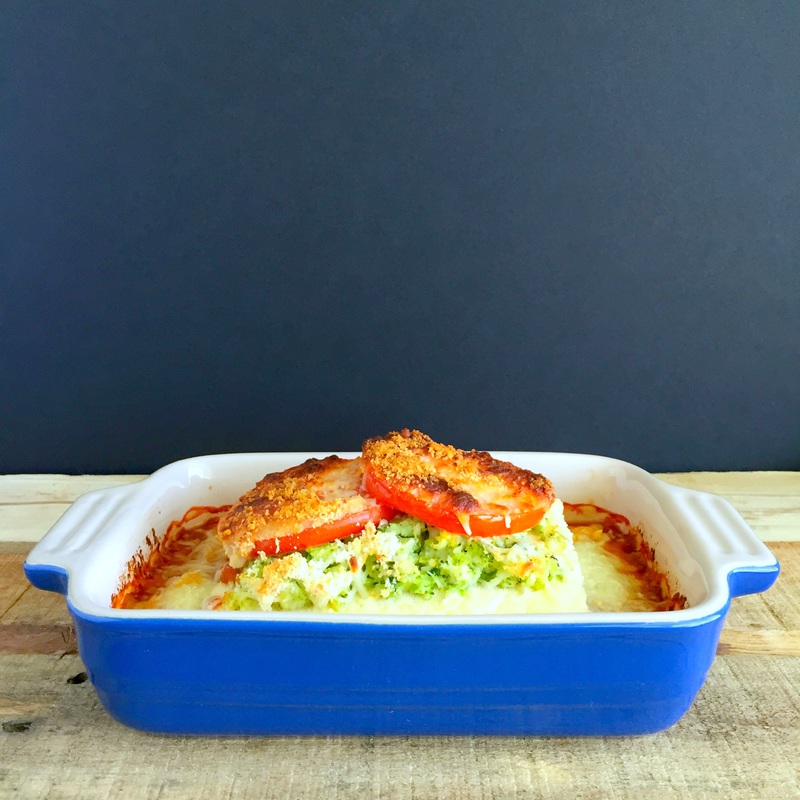
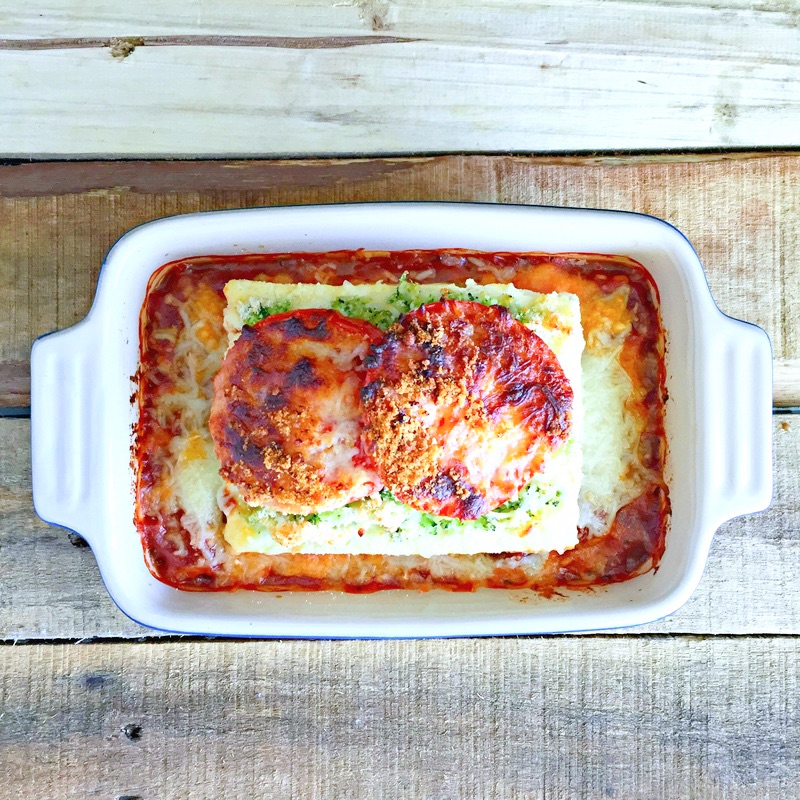
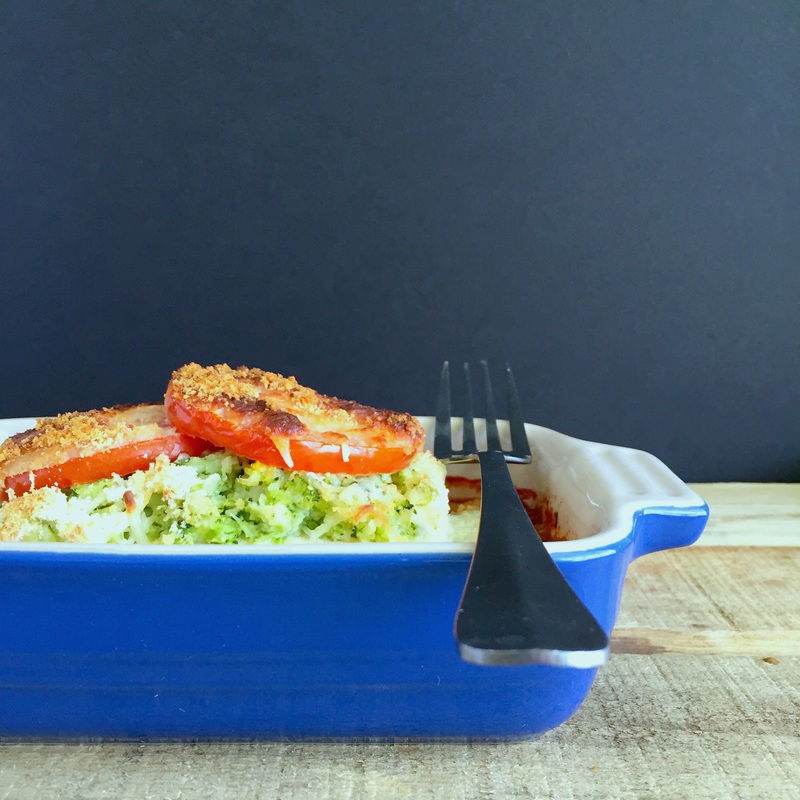
My lightened up approach to potato au gratin subs in eggplant, zucchini, pesto and lots of cheese! This is one of those dishes that anyone can make. All you have to do is slice, layer and bake. Easy! 

Included in the recipe is a homemade pesto, but store-bought is fine too. If you're serving a traditional lamb, a mint pesto will work well. In this case, I went the basil route because we typically have ham or a roast for Easter.

I love breaking out my beat-up, eggshell blue, French inspired pan. This particular pan has never been anywhere near France, but it looks like I could have purchased it there. So, if you have an old pan or baking dish that you love, show it off. And let someone else cook the potatoes. This is much easier!
Picture
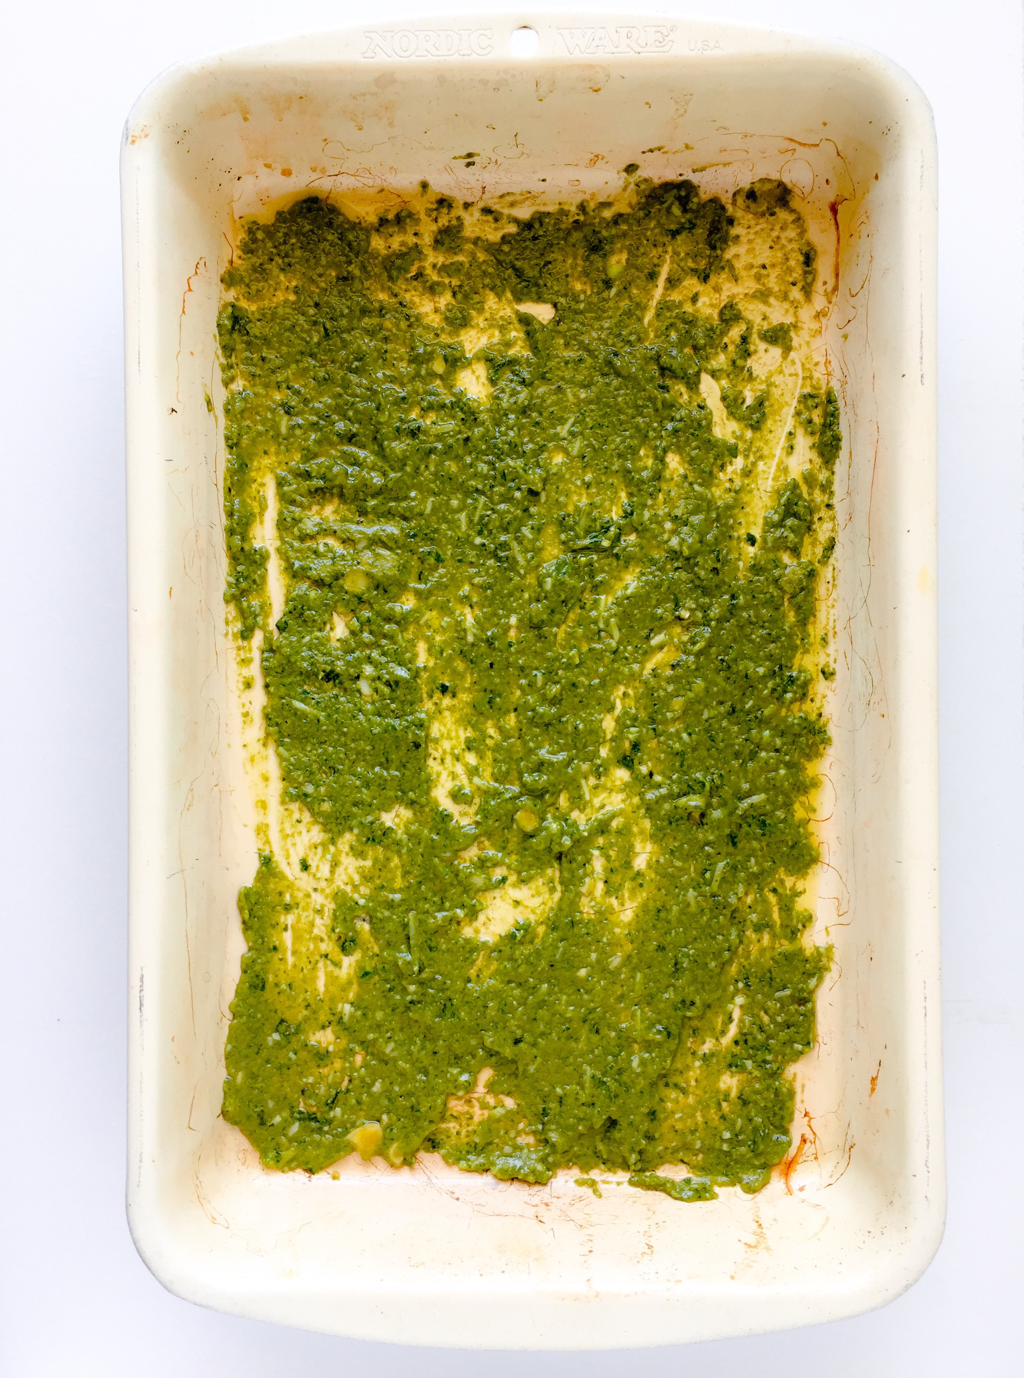
Step 1: Spread the pesto mixture evenly over the bottom of the baking dish.
Picture
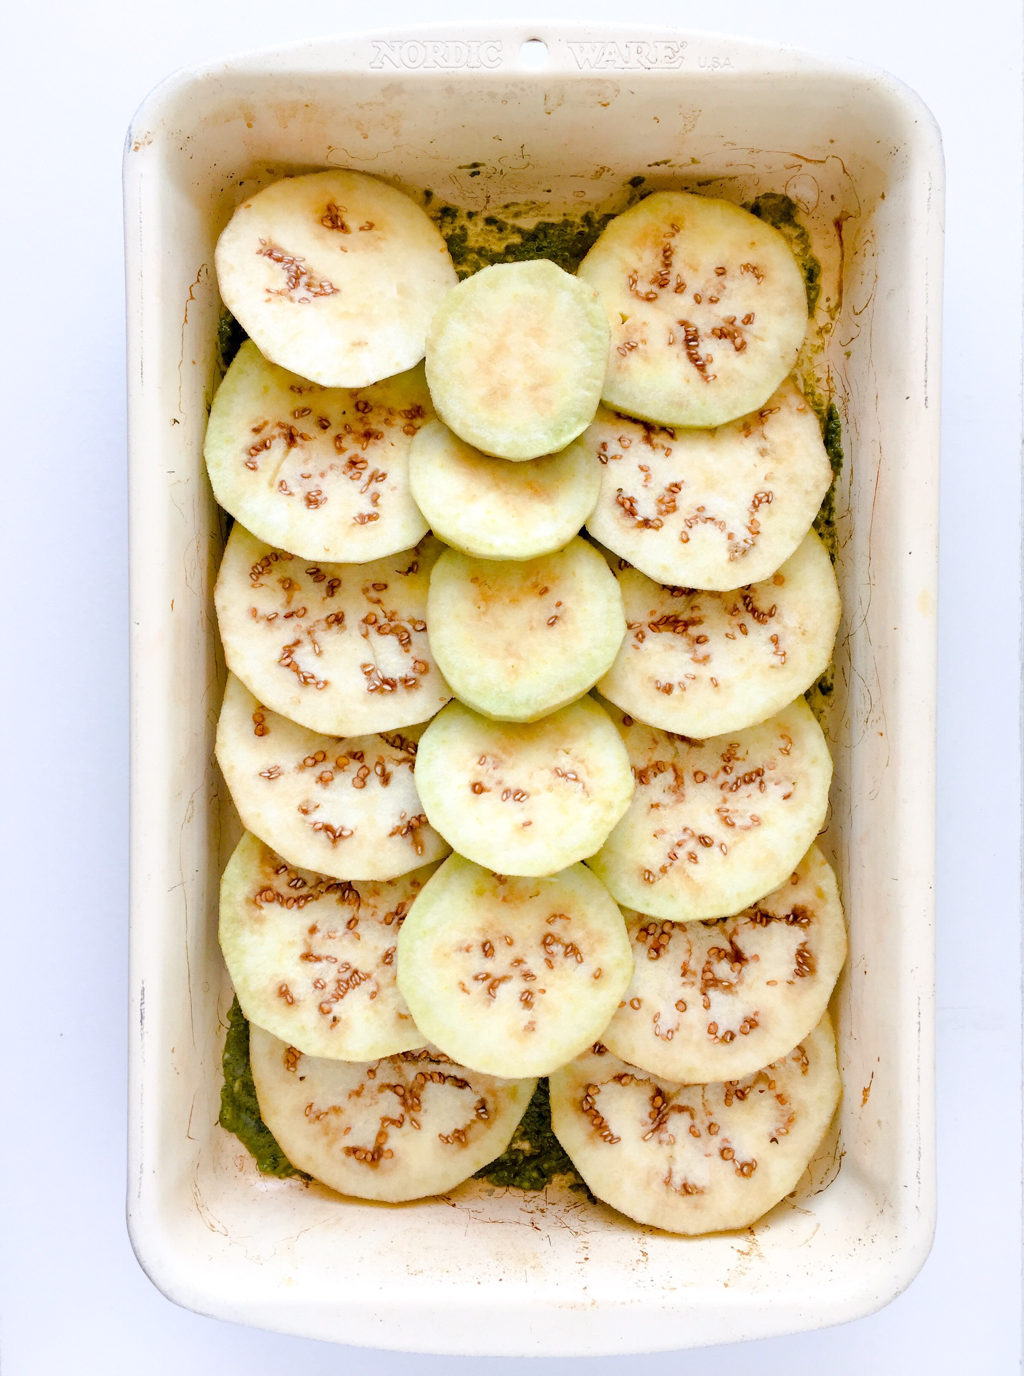
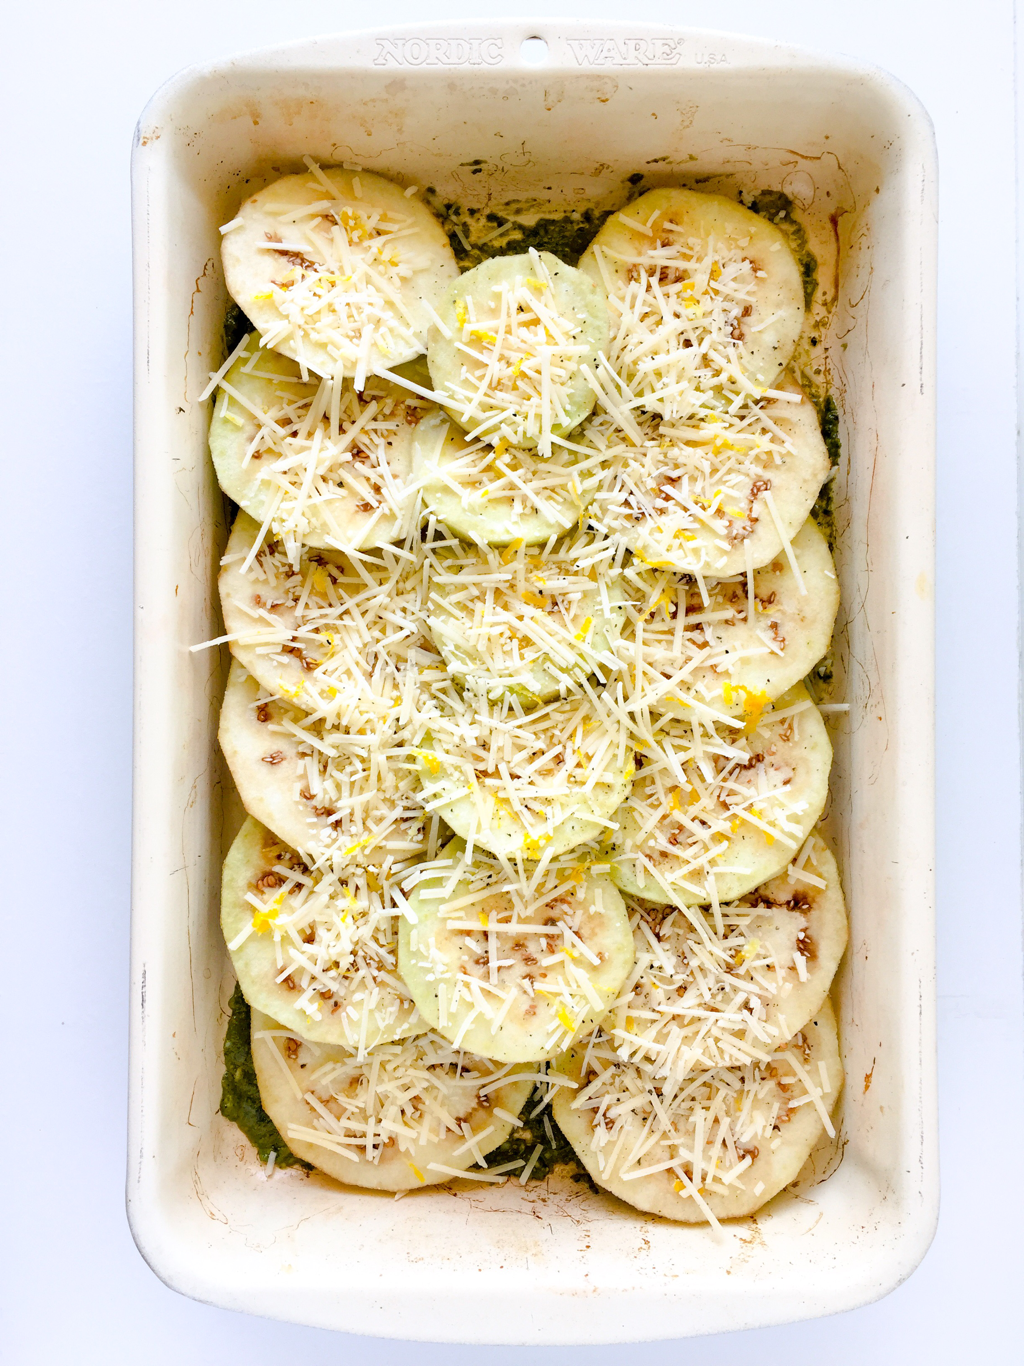
Step 2: Place the eggplant slices over the pesto, starting with the largest slices first.
Picture
Step 3: Sprinkle a third of the lemony cheese mixture over the eggplant. 
Picture
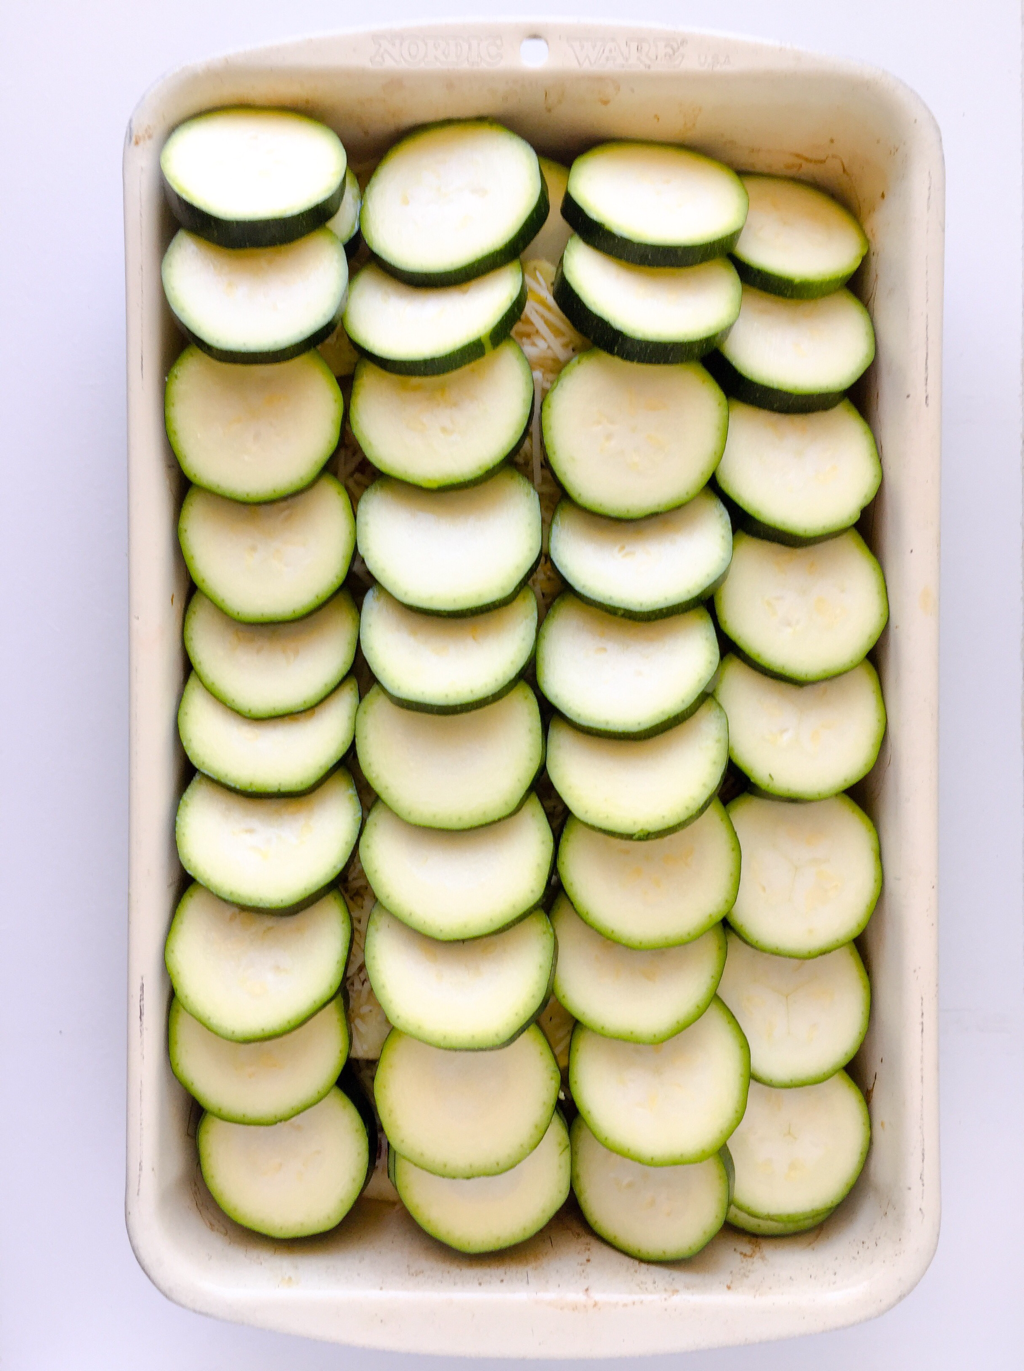
Step 4: Layer the sliced zucchini over the cheese.
Picture
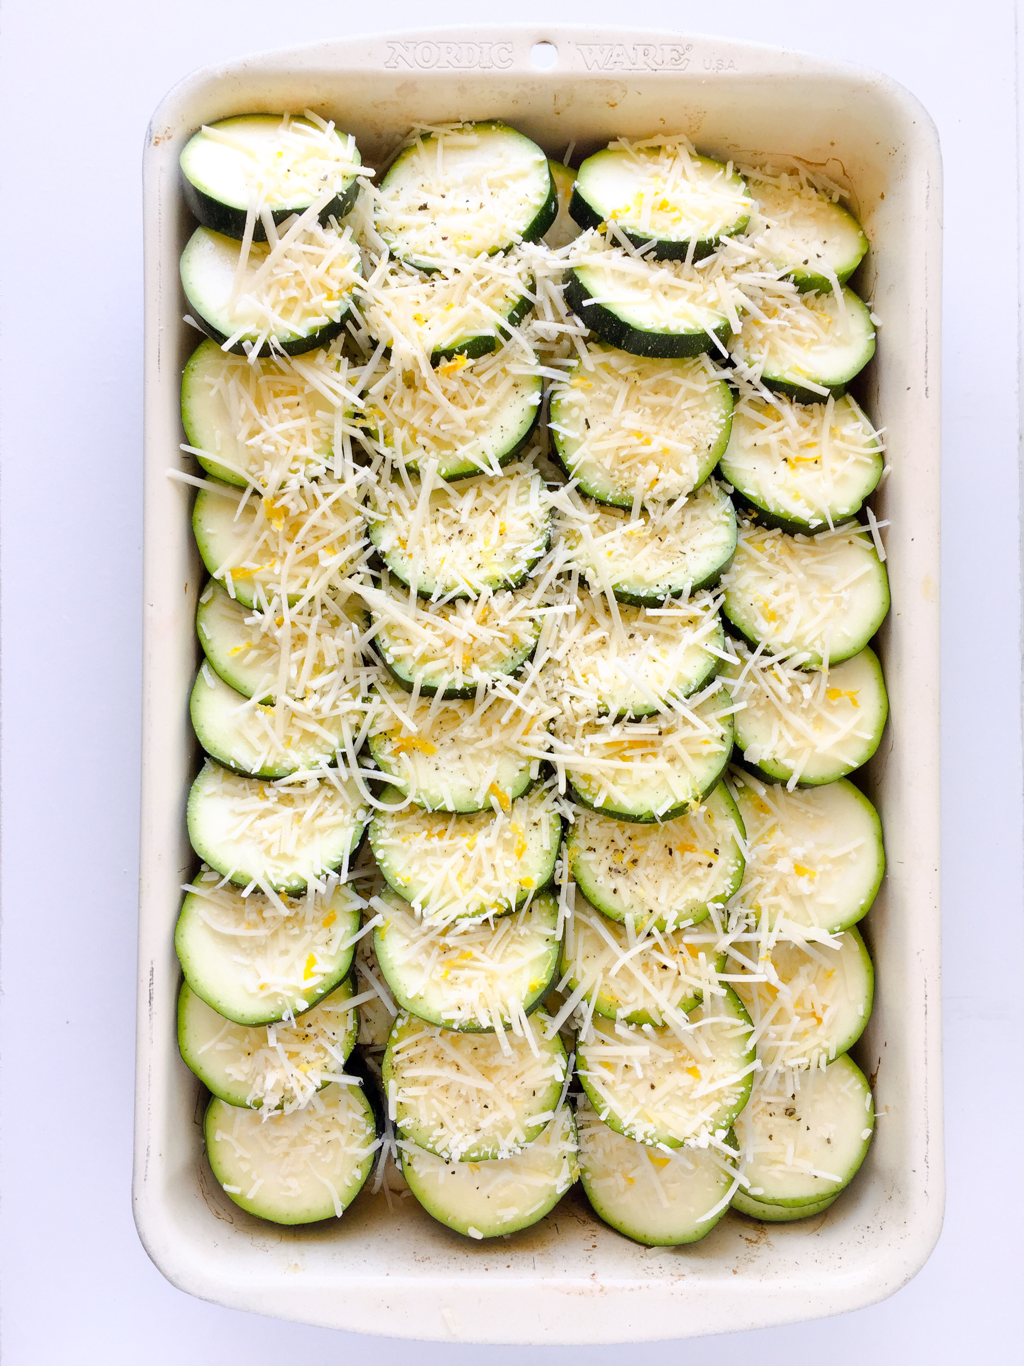
Step 5: Sprinkle the remaining cheese onto the zucchini.
Picture
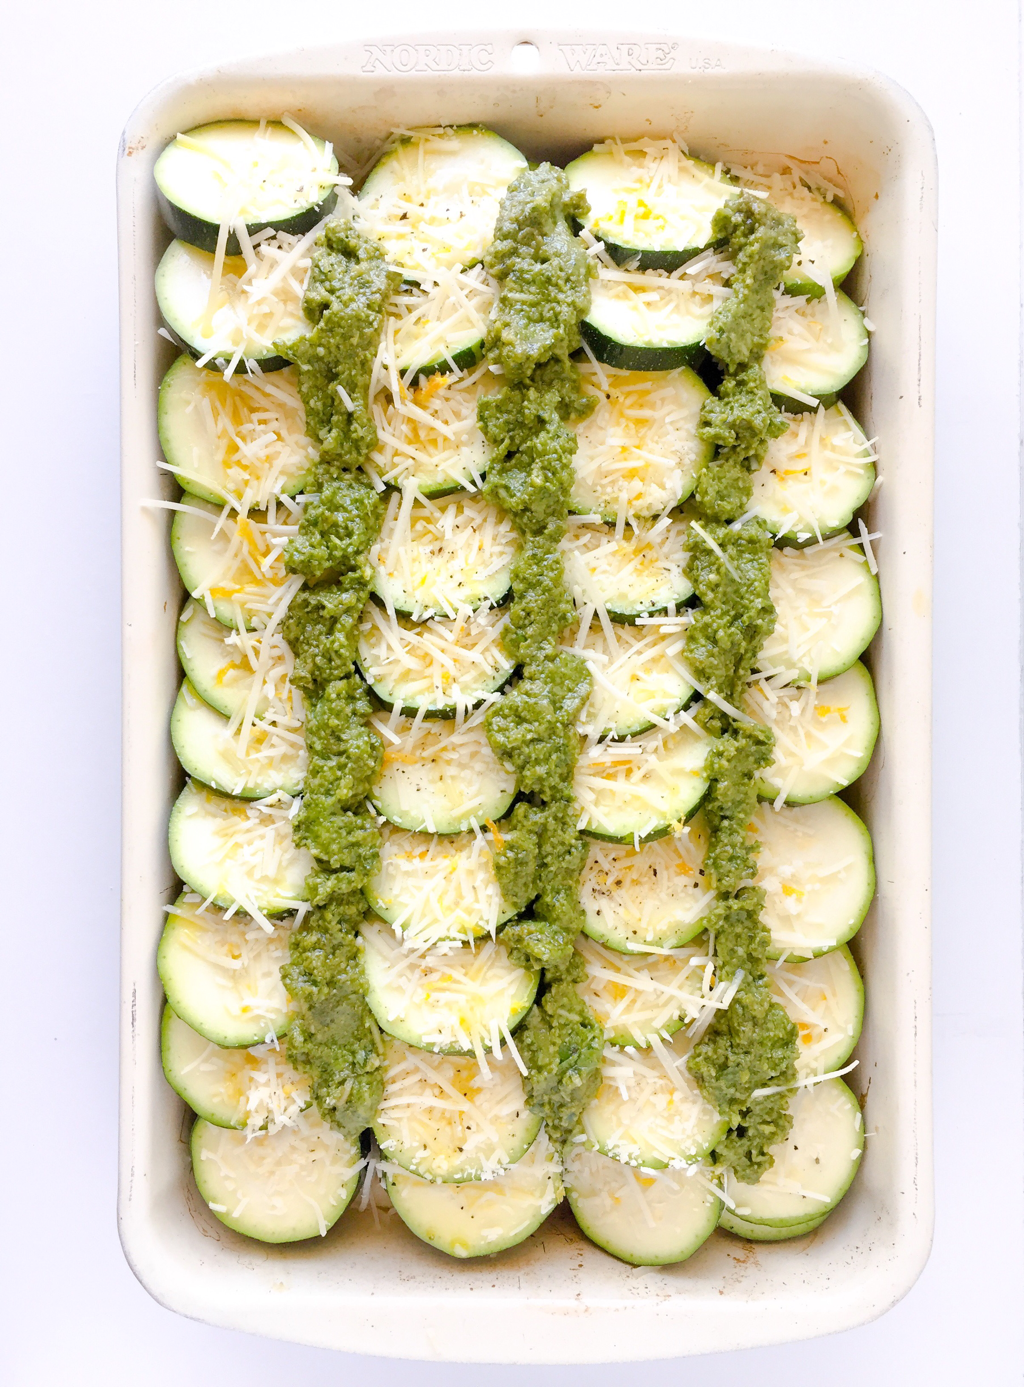
Step 6: Spoon the pesto into any gaps between the layered zucchini.
Picture
Ingredients:

Pesto:
1 bunch fresh basil, stems removed 
2 cloves garlic
3/4 cup grated Parmesan cheese
1/2 cup sliced almonds
1 cup extra virgin olive oil
salt and freshly ground pepper to taste

Directions:
To make the pesto, puree all ingredients in a high speed blender or food processor. Store in an airtight container until ready to use.

Au Gratin:
1 cup pesto, homemade or store-bought
1 large eggplant, peeled and sliced
Kosher salt
zest of 1 lemon

1 cup freshly grated Parmesan cheese
freshly ground black pepper

2 zucchini, sliced

Directions:
Place the eggplant on a plate and sprinkle generously with salt. Allow to sit for 30 minutes, then rinse with cold water.

Pre-heat the oven to 400ºF.  Evenly spread a quarter of the pesto into a baking dish. Place the eggplant slices over the pesto layer. In a bowl, toss together the lemon zest, cheese and pepper. Sprinkle a third of the cheese mixture over the eggplant. Layer with the zucchini slices. Cover with the remaining lemon, cheese and pepper. Spoon the remaining pesto along any open spaces between the zucchini slices. Bake for 40-45 minutes or until bubbling and golden. Turn the broiler on high and cook for 1 minute to finish it off. 

Yield: 12-18 servings
Pin It
0 Comments

Cranberry Couscous Salad

11/16/2016

0 Comments

 
Picture
Alright, I have a confession. Halloween aside, I really, REALLY dislike the holidays. Frankly, if there were no family obligations to consider, I would choose not to celebrate at all. My reasoning goes something like this. Holidays are expensive, a ton of work and filled with heightened expectations where someone always winds up disappointed. Not to mention that many businesses go on a month long hiatus, making it difficult to get any work done. Currently my husband and I are neck-deep in a major house renovation project, scrambling to get things like kitchen cabinets ordered and major projects finished before the experts and their businesses shut down for the festivities.

The one aspect of the holidays I actually do enjoy is the food. Planning it, cooking it, eating it - I love it all! 

For the most part, I try to make people happy by cooking the traditional foods everyone expects. Once that's done, it frees me up to make a couple of new dishes, many of which become requests for future gatherings.

This salad is an idea I am considering serving this year. It turns seasonal ingredients into a light, quick and healthy side dish that everyone will love. The creamy sweet and sour cranberry dressing is balanced by the sugary raisins, nutty pecans, spicy ginger and seasoned couscous. The jewel tones are so pretty and festive that everyone will want to try a bite. 

If you choose to garnish the salad with fresh cranberries, be sure to warn your guests that they are only for looks!

​Happy Eating!
Picture
Picture
Ingredients:

Salad:
​1 cup uncooked couscous
1/4 cup chopped pecans
1/4 cup golden raisins
1/2 teaspoon freshly grated ginger
salt and pepper to taste
1/3 cup feta cheese
handful baby spinach

Dressing:
1/2 cup fresh cranberries, plus 1/4 cup reserved
1 tablespoon white balsamic vinegar
3 tablespoons pure maple syrup
1/4 cup extra virgin olive oil
salt and pepper to taste
1-2 tablespoons water, optional*

Directions:

To make the salad:​ Bring 1 & 1/4 cups of water to a boil in saucepan. Add the couscous and simmer for about 8 minutes. Remove from heat, transfer to a strainer and rinse with cold water to stop the cooking process. In a large bowl, combine the couscous with the pecans, raisins, ginger, salt and pepper. Gently fold in the cheese and spinach. Spoon onto a serving platter, garnish with reserved cranberries and set aside. 

To make the dressing: place all of the ingredients except the water in a high speed blender or food processor and puree until smooth. If the mixture seems a little dry, add the water one tablespoon at a time until smooth. Pour the dressing into a dish to serve alongside the salad.

​Yield: 4 servings

I Quit Sugar Christmas Cookbook
Yum
0 Comments

Smoky Pumpkin Mac and Cheese

10/18/2016

0 Comments

 
Picture
Whenever we travel, it seems that we always find the most amazing restaurant on the last day of our vacation. The type of place we would gladly return to again and again, if only we knew about it.

This scenario is exactly what happened to my husband and I over the summer on a trip to Orlando. We had spent the previous few days frequenting a decently mediocre eatery down the street. Looking to have a quick brunch before catching our flight home, we ambled over to a restaurant directly across from our hotel. A short time later, we found ourselves absolutely dying over a dish of smokey gouda macaroni and cheese topped with bbq pulled pork, and wondering why, OH WHY hadn't we gone there sooner?!

I think about that meal often, mulling over creative alternative toppings. What I love about this recipe is that it allows me to enjoy cheese, while limiting the excess fat and cholesterol found in traditional mac and cheese dishes, like the version I ate on vacation. The trick is to pair a creamy vegetable, in this case pumpkin, with a boldly flavored cheese like smoked gouda and a touch of salt because a little goes a long way. And if you serve this as a side dish, it is hard to overindulge. The sautéed vegetables pair nicely with the pumpkin, but if yours is a carnivorous family, I won't blame you one bit if you swap it for bbq pulled pork.
Picture
Ingredients:
2 tablespoons extra virgin olive oil
1 cup sliced cipollini onions
2 cups baby bella mushrooms, quartered
salt and pepper to taste
1 tablespoon crushed sage
1/4 cup frozen peas
2 cups cooked small pasta, such as orecchiette, elbows, etc.
1 cup roasted pumpkin
​1/3 cup skim, unsweetened nut or soy milk
1/2 cup shredded smoked gouda

Directions:
In a sauté pan, heat the oil and cook the onions until translucent. Add the mushrooms and continue cooking until browned. Sprinkle with salt and pepper to taste, then stir in the sage and peas. Remove from heat and set aside.

Cook the pasta in boiling water until al dente. Reserve 1/4 cup of the water before draining the pasta and returning to the pan.

Purée the pumpkin using a blender or food processor, adding the milk as needed. Gently mix the pumpkin and cheese with the pasta, adding the reserved pasta water a little at a time to thin it out. Sprinkle with salt to taste. Transfer the pasta to a baking dish. Top with the onion and mushroom mixture. Bake at 400ºF for 10 minutes.

Yield: 4 servings
Yum
0 Comments

Basic Gluten-Free Lo Mein

9/9/2016

2 Comments

 
Picture
Today on the blog is the base for my homemade lo mein. As written, it usually serves as a side dish with dinner, while the leftovers make a versatile lunch tossed with shrimp, chicken, or additional vegetables.

At its heart is the sauce, composed of four very necessary components: Chinese cooking wine, tamari, oyster sauce and honey. After much experimentation, my conclusion is that something will always be missing if one of these is left out.

Chinese Cooking Wine: not to be confused with sweet Japanese mirin, this product is a savory wine made from rice, salt and water. Most often found in asian specialty markets, it is increasingly sold in national grocery chains.

Tamari: is a (generally) gluten-free alternative to soy sauce. Be sure to check the ingredient list, as some brands do contain small amounts of wheat, though comparatively less than soy sauce which is typically 40-60% wheat. Additionally, tamari is milder in flavor. My preferred brand is San-J low sodium tamari.

Oyster Sauce: frequently used in Chinese cooking, this is a must for lo mein. Look for a brand that does not use chemicals, such as Kikkoman.

Honey: the purpose of the honey is to cut the saltiness of the sauce, not to overly sweeten it. If possible, use a pure local honey rather than mass produced brands which typically contain corn syrup and preservatives.
Picture
Picture
Ingredients:
1/4 cup Chinese cooking wine
1/2 cup chicken or vegetable broth
3 tablespoons low sodium tamari sauce
2 tablespoons oyster sauce
1 teaspoon sesame oil, *optional
1 heaping tablespoon honey
1 garlic clove, minced
1 teaspoon freshly grated or 1/4 teaspoon ground ginger
2 tablespoons extra virgin olive oil
1 small yellow onion, sliced
1 large carrot, julienned
3 scallions, julienned
16 ounce package gluten-free brown rice spaghetti

Directions:
Combine the wine, broth, tamari, oyster sauce, sesame oil if using, honey, garlic and ginger. Set aside.

Using a saute pan, heat the oil over medium-high and cook the onion and carrots for 5-7 minutes, until softened. Add the scallion and sauce, continuing to cook another 2-3 minutes.

Bring a pot of water to a boil and cook the spaghetti according to package directions, usually about 7-10 minutes. Strain and rinse under cold water to avoid overcooking. Return the spaghetti to the pot and toss with the sauce.

​Yield: 8 servings
Yum
2 Comments

Baked Eggplant Ball Casserole

8/26/2016

0 Comments

 
Picture
My Italian grandmother makes a mean meatball. Getting her to share an actual recipe, any recipe, is extraordinarily difficult. Every attempt to find out her secret is met with the same answer, "oh I just add this and this and a little of that." Sigh... Whatever it is that she tosses in there, I can never quite get it right. 

Fortunately, my father-in-law is an Italian-American from Yonkers, New York who enjoys sharing everything he knows with anyone who will listen. In the kitchen, the one thing he knows really well is how to make a great meatball. Thanks to him, I now understand what has been missing from mine. In my search, I have read tons of recipes and they all lack this key ingredient, as evidenced by the commenters complaining on lack of flavor. That ingredient is...ketchup. Not tomato sauce, not tomato paste. Ketchup. Surprised? Me too. What Italian uses ketchup? But it works. 

​This recipe is an adaptation of my father-in-law's version, which calls for ground beef. I tend to make mine with lean ground turkey, especially in the warmer months when I want something lighter on the stomach. But some days I just want to be completely meat free, and this dish is a good stand-in.

Included in the ingredient list are substitutions to accommodate vegetarians, vegans and those with gluten intolerance. The most labor intensive part of this dish is grating the eggplant, but well worth the effort to achieve a meatball-like texture that holds together.

Buon appetito! And as my grandmother would say, "mangia, mangia before it gets cold!"
Picture
Picture
Ingredients:
1 medium eggplant, peeled and shredded
Kosher salt
1 tablespoon oregano
1 tablespoon parsley
2 garlic cloves, minced
​2 tablespoons ketchup
1/4 cup regular or vegan Parmesan cheese
1/2 cup regular or gluten-free seasoned breadcrumbs, plus 3/4 cup reserved
1 large egg + 1 tablespoon water or 1 tablespoon ground flax seed + 2-3 tablespoons water
extra virgin olive oil
2 cups tomato sauce
​1/2 cup shredded skim-milk or vegan mozzarella

Directions:
Shred half the eggplant with a cheese grater and place in a metal sieve perched over a bowl to catch any liquid. Sprinkle generously with salt and repeat the process with the remaining eggplant. Let stand for 15 minutes. Rinse well with water, lightly drain and transfer to a sauté pan. Cook over medium-high heat until softened. Remove from heat and transfer to a bowl to cool.

Stir in the oregano, parsley, garlic, ketchup, cheese and crumbs. Scoop out a small spoonful of the mixture and form into a ball. If it does not hold its shape, add breadcrumbs a little at a time to form a stiffer mix. Refrigerate for 30 minutes to an hour.

Pre-heat the oven to 400 degrees F. Pour the reserved breadcrumbs onto a plate. In a separate dish whisk the egg, or the flaxseed if using, with the water. Scoop out a small spoonful of the eggplant mixture and form into a ball. Coat with the egg or flaxseed dip, then the breadcrumbs. P
lace into a greased mini muffin pan and repeat until all of the mixture is gone.

Bake for 30 minutes, gently flipping the eggplant balls about halfway through the cook time with a metal spoon.

Meanwhile, coat the bottom of two mini casserole baking dishes with tomato sauce. Remove cooked eggplant balls from oven and transfer six to each dish. Top with remaining sauce and cheese. Place under a broiler for 4-5 minutes, or until cheese begins to bubble.

​Yield: 1 dozen mini eggplant balls
Yum
0 Comments

Warm Sweet Chili Couscous Salad

4/4/2016

0 Comments

 
Picture
I'm a pasta fanatic, happily sharing my recipes while quietly waging a war with myself over eating too much of the stuff. Pasta is one of those foods I could eat everyday and be happy. Which is why, there are a growing number of posts on my blog highlighting pasta alternatives. But, even a health conscious food blogger has her indulgences. After all, most of us food bloggers are foodies, which is a nice way of saying we enjoy eating nearly everything, in excess, if no one is looking.

The idea for this sweet chili couscous salad came about after a trip to my local Trader Joe's, where I discovered a box of frozen mahi-mahi burger patties that could be grilled, broiled or baked. Even a food blogger has busy days, so this was a find that I could easily bake in my toaster oven for just 8 minutes per side. A bit of Mae Ploy sweet chili sauce and side of steamed vegetables would have been fine accompaniments, but I knew I could create a wonderful side dish with just a teensy bit more effort. 

And so came about this tasty warm salad. The flavors in the dressing are sweet and mildly sour, pairing well with delicately flavored proteins including chicken, most fish and tempeh. Served alone, it is a hearty and filling dish.
Picture
Ingredients:

Dressing:
juice of 1 orange or 1/4 cup orange juice
1/2 teaspoon rice vinegar
1 tablespoon orange marmalade
1 tablespoon sweet chili sauce, (recommend Mae Ploy)
1 tablespoon freshly grated ginger
1 teaspoon low sodium tamari sauce
1 garlic clove, minced

Salad:
1 cup Israeli couscous
1 tablespoon sesame or extra virgin olive oil
1 large carrot, grated
1/4 cup raisins
2 scallions, chopped
salt to taste

Directions: 
Pour or squeeze the orange juice into a liquid measuring cup. Add all of the remaining ingredients, mix well and set aside. 

Bring 1 and 1/4 cups of water to a boil in a small sauce pot. Add the couscous, reduce the heat, cover and simmer for 8 minutes. Remove from heat and stir in the oil, gently breaking up any clumps. Add the carrot, raisins, scallion and salt. Mix in the dressing and serve. Refrigerate any leftovers for up to 3 days.

Yield: 4 servings
Yum
0 Comments

6-Ingredient Tofu Broccoli Bake

3/29/2016

0 Comments

 
Picture
At least once a month I wind up in the grocery store contemplating a package of tofu. High in calcium, protein and iron, tofu has a lot going for it. So I buy it. Then I get it home and forget what I intended to make with it. Or I never had any ideas in the first place, and it lands in the trash. 

The trick to tofu, I eventually find, is a really good sauce. That and staying true to recipes you love and will actually make.

Most days, people just want a fast and healthy meal. But mostly FAST. Keeping a freezer stocked with a variety of pre-cut vegetables, makes life so much easier. Think sliced peppers, peas, cauliflower, cut green beans, shelled edamame, diced zucchini and broccoli. Any of which will work in this recipe, by the way. 

As much time as I spend cooking from scratch, I too keep staples in my pantry for time-saving shortcuts. In fact, if I were to take a snapshot right now, you would see jars of tomato sauces, pestos, curries and boxed broths that I can quickly doctor and add to anything.
Picture
Some of my other timesavers include a toaster oven, which tends to heat up faster than a conventional oven. And using single serve dishes, which cooks the food more quickly than larger pans. These also come in handy when my husband and I can't quite agree on all the components of our dinner.

If you don't own the exact size or shape dish that I recommend in this recipe, don't despair. I could probably host my own flea market with my collection of Le Creuset alone. But in this case, a small loaf pan or glass baking dish will work just as well. Simply trim your tofu layers to fit accordingly.
Picture
Ingredients:
1 cup frozen broccoli, thawed
2 heaping tablespoons finely grated parmesan cheese + 1 tablespoon reserved

1/4 cup shredded part-skim mozzarella cheese
​salt and pepper to taste

5 heaping tablespoons tomato sauce, jarred or homemade
1 tub of firm or extra firm organic tofu, drained
2 tomato slices

Directions:
Preheat the oven or toaster oven to 375ºF. 

In a blender or food processor, puree the broccoli for just a few seconds until crumbly. Transfer to a bowl, add the parmesan and mix with half of the mozzarella. Season with salt and pepper, then set aside. 

Pour several tablespoons of sauce into the bottom of a 5x7 inch rectangular baking dish. Gently shake the pan back and forth to distribute the sauce into an even layer.

Using a cutting board, place the tofu block on its side and slicing lengthwise, section off two 1/4-inch thick rectangular portions. With a paper towel, gently press any liquid from each tofu slice. Then place one tofu slice into the bottom of the pan. If using a different size dish, it may be necessary to trim a bit off in order for it to fit. Spoon half of the broccoli mixture onto the tofu, spreading into an even layer. Cover with the second tofu slice, then layer on the last of the broccoli mixture. Top with the tomato slices. Pour any remaining sauce around the sides of the tofu. Sprinkle with mozzarella and parmesan cheese. Bake uncovered for 20-25 minutes, or until the cheese is golden and the sauce is bubbling. 

Yield: 1 individual serving
Yum
0 Comments

Pasta with Roasted Pistachio-Lemon-Chili Pesto

3/18/2016

0 Comments

 
Picture
Ready for another pesto recipe? This one has been rolling around my head for awhile. I finally had it for lunch today and I am SO glad I made extra. Even if you go for it and choose the less healthy white pasta, the portion size should help reduce any afternoon sluggishness due to sudden dips in blood sugar. How do you make that happen when you have a whole pot of the stuff in front of you and no one else at home to feed? Measure out one cup, add it to a bowl or salad size plate and freeze the rest. Immediately. Trust me, it's a lot harder to go for seconds when its packed away next to the ice cream. Speaking of which, you should probably just go ahead and throw that out...unless of course you substituted the pasta with a healthier choice. In that case you MIGHT have earned a small dessert.

In some of my older posts, I talk about spiralizing vegetables in place of pasta. I chose not to do that here, but if you were wondering what might be a good vegetable alternative, sweet potatoes receive my highest recommendation. The extra sweetness adds a whole other element to the pistachio-lemon-chili combo. Both cubed and spiralized potatoes work well. Zucchini and yellow squash come in second for their mild flavor and flash cooking time.

And if you don't like mushrooms? There are many other choices that would work well too. Sautéed fresh asparagus, broccoli, peas or carrots. Even easier, root around in your freezer and toss some frozen vegetables in with the pasta during the last 2-3 minutes before draining it. Then add a smidge of salt and pepper to taste, stir in the pesto and voilà! Whatever you choose, make sure the flavor isn't so strong as to overpower the pesto.
Picture
Ingredients:

Pesto:
1/2 cup pistachios, shelled

2 cups flat leaf parsley
2 cloves garlic
3 tablespoons fresh lemon juice, or more to taste
​1/2 cup extra virgin olive oil
2-3 tablespoons water, as needed

1/2 cup finely grated dairy or vegan parmesan cheese
1/4 to 1/2 teaspoon chili powder

Pasta and Mushrooms:
16 ounces fusilli pasta, (quinoa, brown rice and wheat pasta all work well)
1 tablespoon extra virgin olive oil
16 ounces sliced mushrooms
salt and pepper to taste

Directions:

Pesto:
Pre-heat the oven to 350ºF. Spread the pistachios on a small cookie sheet and bake until lightly browned, about 8-10 minutes depending on your oven. Remove and allow to cool for about 5 minutes.

In a food processor or high speed blender, pulse the pistachios, parsley, garlic, lemon juice and olive oil until smooth. If needed, stop to scrape the sides and loosen the pesto mixture near the blades with a rubber spatula. If the machine struggles to smooth the pesto out, add the water one tablespoon at a time until a thick paste forms. Blend the cheese and the chili powder (1/4 teaspoon at a time to determine spice tolerance), into the pesto and set aside.

Pasta and Mushrooms:
In a skillet, heat the olive oil over medium-high. Add the mushrooms, season with salt and pepper and cook until golden brown on all sides, turning frequently. Set aside. Boil the pasta according to package directions and drain into a colander. Return the pasta to the pot, add the mushrooms and gently stir in the pesto. Divide among 8 bowls and garnish with a bit of parsley. Serve alone or with a tossed salad and warm bread.

Yield: approximately 1 cup pesto / 8 total servings when combined with the pasta and mushrooms
Yum
0 Comments

Carb-Free Vegetable Primavera

11/20/2015

0 Comments

 
Picture
For about two months now, an unopened Crate and Barrel box containing a vegetable spiralizer has been collecting dust on the floor of my guest bedroom. A spiralizer is a trendy new gadget which uses a series of blades to spin soft vegetables into noodles. Since I clearly love to cook (the only logical reason for running a completely income-less blog) one would think this shiny new toy would be utilized right away. But then it arrived and...nah. Too much work. I only ever enter my guest bedroom to grab the vacuum cleaner. Which is about every other day since I live with two dogs and a slob who regularly track leaves, dirt and little sticks all over my floor. So for eight weeks that Crate and Barrel box has sat there staring at me each time I enter that room. 

With all the heavy holiday foods looming on the horizon, I finally got the thing out. I don't have a party or a family gathering to attend every day, and there is no reason to eat as if I do. One of my secrets to never gaining weight during the holiday season is to limit treats to the days I have them scheduled. I don't keep a candy bowl out and I rarely eat holiday desserts unless there is a pre-planned occasion where someone has taken the time to bring or prepare something special.

If you don't have a spiralizer, and want to recreate this recipe, the cheapest option is a hand held potato peeler, which makes a great pappardelle out of zucchini and squash. You can always add the Paderno Spiralizer to your holiday list due to its great reviews. Since I own a KitchenAid Mixer, it made more sense to order the attachment, which works great. The whole process from assembly to clean-up is very easy. The fact that it can be used to make curly fries for my meat-n-potatoes husband is a bonus, should I ever tire of vegetable noodles.

I chose to post a primavera recipe on the blog because of how easy it is to pull together. Zucchini and yellow squash noodles take just minutes to cook, while the sauce is versatile and will work with any combination of vegetables. 

Ingredients:
1 onion, halved and sliced thin
1 bell pepper, cut into strips

1 medium carrot, julienned
1/2 cup broth, any variety, plus 1/2 cup reserved
1/4 cup broccoli florets
1/2 cup grape or cherry tomatoes
2 cloves fresh garlic

1/2 cup white wine
salt and pepper to taste
1/2 cup milk, any variety
1/4 cup grated parmesan cheese
1/2 teaspoon each fresh or dried Italian herbs (oregano, basil, thyme, flat leaf parsley)

1 medium zucchini, spiralized 
1 medium yellow squash, spiralized

Directions:
In a large saute pan over medium-high heat, cook the onion, pepper, carrot and broth until the vegetables absorb the liquid. Add the broccoli, tomatoes, garlic, wine, salt and pepper, milk and reserved broth. Continue cooking until the liquid reduces by half. Stir in the cheese and herbs. Remove from heat. 

Meanwhile, bring a large pot of water to a boil. Add the zucchini and squash noodles. Cook for 2-3 minutes. Remove from heat and pour into a large strainer. Use a pair of tongs to pile the noodles onto a serving dish. Top with the primavera sauce.

Yield: 2 large servings
​
0 Comments

India: Vegetable Medley

5/1/2015

0 Comments

 
Picture
A simple accompaniment to Chicken Moilee, this side dish offers a milder combination of spices. While it might be tempting to replace the butter or ghee with a heart healthy oil, resist the urge. The sweet saltiness imparted by the butter balances the bitterness of the fenugreek.
Picture
Picture
Ingredients:
2 tablespoons butter or ghee
1 teaspoon black mustard seed
1 teaspoon fenugreek
1 small onion, minced
3 cloves garlic, minced
1/2 head cauliflower, finely minced
3 carrots, finely minced into 1/4 inch pieces
1 handful green beans, finely minced into 1/4 inch pieces
1 whole thin red chili
5-6 fresh curry leaves (optional)
salt and freshly ground black pepper to taste

Directions:
In a large fry pan, melt the butter over medium heat. Add the mustard seed and fenugreek. When the spices begin to pop, add the onion and garlic. Sauté until the onion becomes translucent. Add the remaining vegetables. With a knife, cut long slits into the chili and add it to the pan along with the curry leaves. Cover, reduce the heat to medium-low, and stir occasionally until the vegetables become tender. Stir in the salt and pepper to taste.

Yield: 4 Servings
0 Comments
<<Previous
    Fitness Training:
    Located in the Hudson Valley or Westchester NY? Contact me for a trial in-home fitness training session!

    Author

    Sarah Inglis is a increasingly vegetarian non-vegetarian, as well as a certified fitness trainer, personal chef, freelance writer and food photographer with degrees in media communications and dietetics. This blog is a collection of healthy recipes, along with a bit of fitness & nutritional information.

    Links

    Affiliate links to products I use and think are great are posted on this site. This means I receive a small commission if you purchase a product through these links, though at no extra cost to you. This is both to cover costs for the blog and to provide helpful tools to the reader. Thank you for supporting Embody Fitness & Nutrition!

    Categories

    All
    Appetizers
    Breakfast
    Burgers/Sandwiches/Tacos
    Desserts
    Entrees
    Fitness Info
    Juice Recipes
    Nutritional Info
    Salad
    Sides
    Snacks
    Soup
    Toppings
    Travel

    Archives

    January 2018
    December 2017
    September 2017
    August 2017
    July 2017
    June 2017
    May 2017
    April 2017
    March 2017
    February 2017
    January 2017
    December 2016
    November 2016
    October 2016
    September 2016
    August 2016
    June 2016
    May 2016
    April 2016
    March 2016
    February 2016
    January 2016
    December 2015
    November 2015
    October 2015
    September 2015
    July 2015
    June 2015
    May 2015
    April 2015
    March 2015

    RSS Feed

© 2015-2018 Embody Fitness & Nutrition. All rights reserved. No content or images may be reproduced in any part or form without written permission.
Proudly powered by Weebly