Embody Fitness & Nutrition
  • Blog
  • Recipe Index
  • Cooking Videos
  • About Me
    • Additional FAQ's
    • Published Work
  • Contact

Copycat Crispy Quinoa VegeFi Burgers

6/1/2017

22 Comments

 
Picture
**UPDATE**
I first shared this recipe back in October of 2015. Somehow, bad photography and all, it endures as one of my most visited blog posts to date. 

Since then, not only did I update the photographs to capture an actual view of the burger, I also tweaked the recipe and cleaned up the directions. To anyone who isn't much of a cook, the recipe might seem intimidating as written. There are a lot of ingredients in this one. But if you read through the directions and just focus one step at a time, it's not so bad. Not to mention that this makes a nice big batch that you can store until you next crave a VegeFi Burger. (Keep reading below for tips.)

Years ago during a culinary class, I remember the chef teaching us the key to a good copycat recipe. First, when not privy to the secrets of the authentic version, identify as many specific ingredients as possible through visuals and taste. (In other words, I had to examine and eat a LOT of VegeFi Burgers.) Then shift the focus to overall flavor, adding and subtracting ingredients to find what works. Be willing to make the item over and over, until a blind taste test can't detect any difference between the copycat and the original.

After much trial and error, I believe I have accomplished that here. 

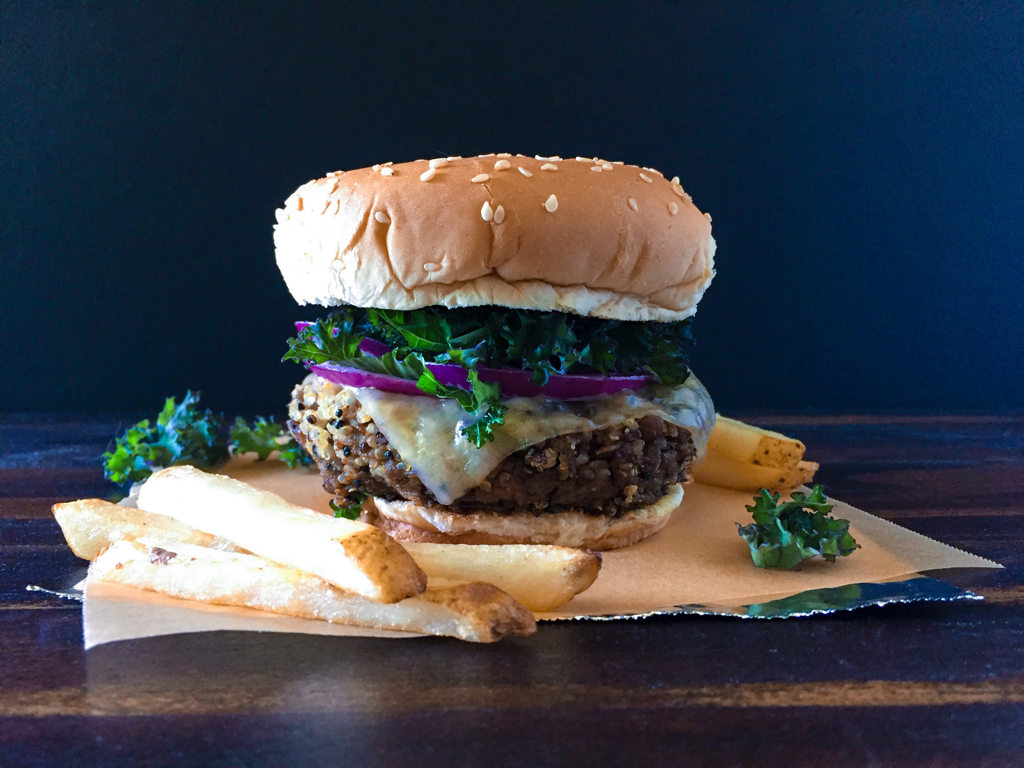
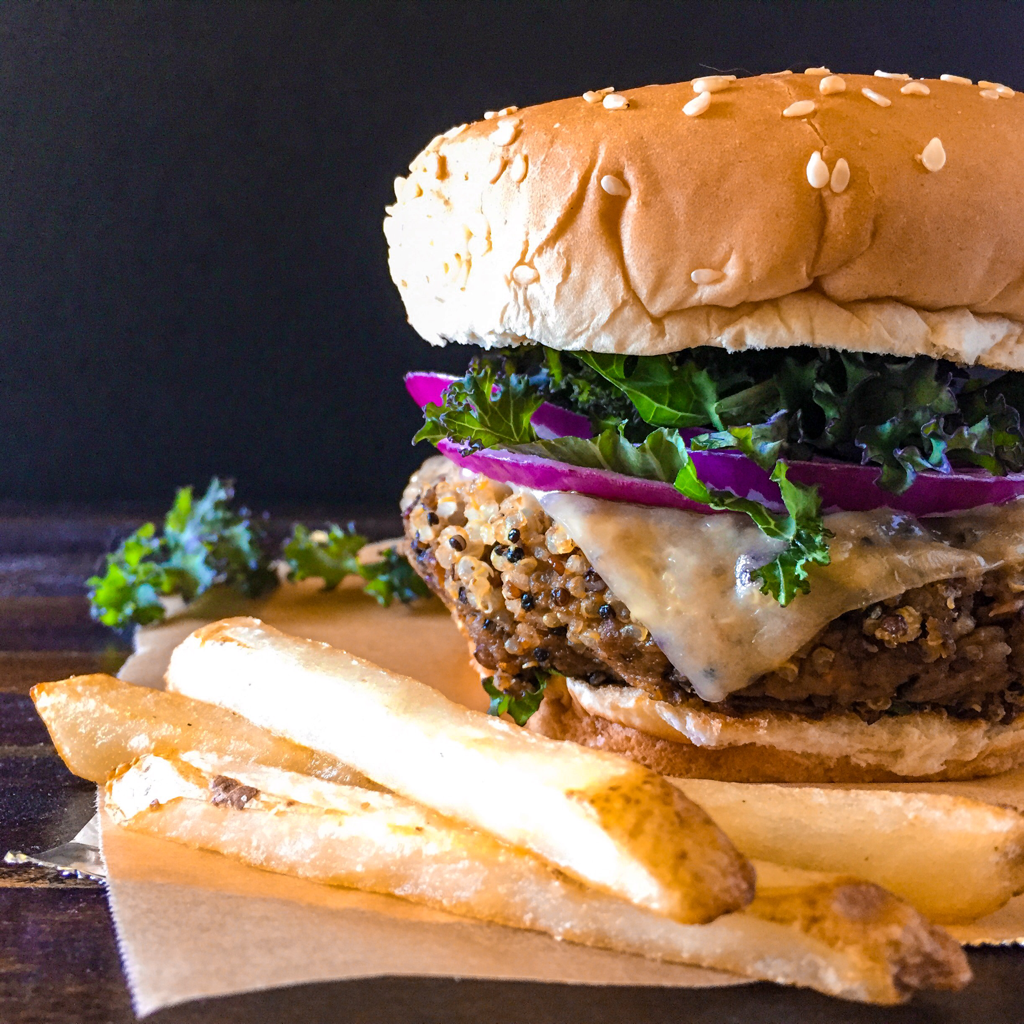
One difference worth pointing out - the real VegeFi Burger is vegetarian-friendly only, not vegan, due to the additions of egg and cheese. With my version, a vegan person has the option to omit the cheeses without dramatically changing the flavor of the burger all that much - and egg is not at all a part of my ingredient list. Also, while the original burger is topped with the usual lettuce-tomato-onion, changing things up by omitting the tomato and swapping out the lettuce with purple kale is a tasty alternative. 

Another tip I neglected in my original post is how well these burgers freeze. Simply wrap in parchment paper and place in an airtight container or ziplock bag. Then defrost and bake at 400ºF in a toaster oven for 5-7 minutes per side.

OCTOBER 2015:
​
I feel lucky that, for the time being, I live just a five minute walk from local shops and restaurants. It's a nice feeling to have convenience packaged into a cute little town only steps away. When a new storefront opens, it's exciting because each one is unique. Just last year, my neighborhood acquired a new BurgerFi restaurant. A little more casual urban than some of the other establishments in the area, it quickly became popular with the local college crowd. 

I normally avoid processed fast food, but being new, I had to try it. For all of us health and fitness advocates out there, I'm sad to say...it was good. It was REALLY good. Then on about the fourth or fifth visit, I tried the Crispy Quinoa VegeFi Burger. WOW! I have never had a veggie burger quite like that. For me, it even beat their beef burgers. But while I admire BurgerFi's efforts to use quality, hormone and antibiotic-free ingredients, they are technically a fast food franchise. I tend to feel better not eating there too often. Particularly since their fries are so tempting. However, I really want that crispy quinoa burger in my regular rotation.

For those of us trying to embody fitness and nutrition while still enjoying decent food, here is my healthier copycat version. I won't go so far as to claim it's exactly like the authentic VegeFi burger. Or even as tasty. Though I doubt anyone will be disappointed after biting through the crunchy quinoa crust into the smooth saltiness of the burger, and the tangy remoulade sauce. 
Picture
Burger Patties:

Ingredients:


Burger Patties:
1 cup uncooked quinoa
1 cup uncooked small green lentils
extra virgin olive oil for cooking
salt and pepper to taste
1 medium onion, chopped
1 medium zucchini, shredded
2 medium carrots, shredded
12 baby bella mushrooms, finely minced
2 cups red wine
1 cup vegetable broth
4 sprigs fresh thyme
1/2 cup freshly grated Parmesan cheese, optional
1/2 cup freshly grated Fontina cheese, optional
2 cups plain panko breadcrumbs

Toppings:
​8 slices white cheddar cheese, optional
8 multigrain or sesame rolls, toasted,
1 medium red onion, sliced thin
8 slices tomato
1 cup lettuce or purple kale leaves, shredded
1 cup vegetarian remoulade sauce, see recipe below**

Directions:
In a medium-size saucepan, bring 2 1/2 cups of water to a boil. Add the lentils, turn heat to low and cover. Cook for 35 minutes, or until lentils are soft and water is absorbed. Meanwhile, in a separate saucepan, bring 2 cups of water to a boil. Rinse the quinoa before adding to the boiling water. Turn heat to low, cover and cook for 15-20 minutes until the water is completely absorbed. Set the quinoa and lentils aside to cool.

In a sauté pan, heat the 2 tablespoons of oil on medium and add the onion. Stir in a pinch of salt and pepper. Cook until caramelized, about 15-20 minutes, stirring frequently. Add the zucchini, carrot and mushrooms. Continue cooking until softened, giving it the occasional stir. Add another pinch of salt and pepper to taste. Remove from heat and transfer the vegetables to a mixing bowl to cool.

Pour the wine and broth into the same sauté pan, add the thyme and bring to a slow rolling boil. Cook until reduced to 1/3 of a cup. Add the wine reduction, and the grated cheeses if using, to the vegetable mixture. Then stir in 2 cups of cooked lentils, 2 cups of cooked quinoa and the breadcrumbs. Transfer half of the mixture into a blender and puree. Spoon the puree back into the mixing bowl, and stir until evenly combined.

Pour the remaining cooked quinoa onto a cookie sheet. Use a rubber spatula to spread it into a thin layer. Form the vegetable mixture into 8 patties. Firmly press each patty onto the cooked quinoa layer. Flip the patties over and repeat. Then, gently press the palm of your hand around the edges and over the sides of each patty to ensure that the quinoa completely coats the patties in a thin layer. Brush off any excess.

Clean the sauté pan, heat the olive oil over medium high heat and cook the patties in small batches, 3-5 minutes per side. Use a thin spatula to gently flip the patties. When both sides are golden brown, add a slice of cheese if using, and cover the pan until the cheese melts. Transfer patties onto toasted rolls. Top with red onion, tomato, lettuce and remoulade sauce.

Vegetarian/Regular Remoulade Sauce:
​
Ingredients:

1 cup vegan or regular mayonnaise
1 teaspoon onion powder
1 teaspoon garlic powder
1 teaspoon sweet relish
1 teaspoon Worcestershire Sauce such as Annie’s Homegrown Organic & Vegan Worcestershire Sauce
1 teaspoon Valentina mild hot sauce
1 teaspoon horseradish sauce, or 1/4 teaspoon plain horseradish
2 tablespoons fresh lemon juice
2 tablespoons chopped fresh parsley
6 chives, finely minced
salt and pepper to taste

Directions:
Whisk all ingredients together in a bowl. Chill until ready to serve.

Yield: 8 burgers

Pin It
22 Comments

Splendry: Chicken & Sun-Dried Tomato Quesadillas

5/29/2017

0 Comments

 
Happy Memorial Day!

Looking for some afternoon reading? Head on over to Splendry, a site geared toward "topics that are light, fun, informative and entertaining." Everything from repurposing household items to cool new beauty hacks can be found there.

While you're at it, check out my tried-and-true recipe for Chicken & Sun-Dried Tomato Quesadillas. A popular staple in my personal chef recipe rotation for many years, these quesadillas freeze well and are great for large gatherings. Need a vegetarian version? Jackfruit works nicely in lieu of the chicken. 

Many thanks to the staff at Splendry.com for the feature!
Picture
Pin It
0 Comments

{Vegan} Stuffed Peppers with Avocado-Tahini Sauce

5/5/2017

0 Comments

 
Picture
Spring is officially here and I couldn't be happier!

My new and improved kitchen is on the market, but I'm making the most of it for however long it remains mine. The yard is begging for a vegetable garden. I know just the spot tucked in a corner near the shed, where plans for tomatoes, zucchini and lots of greens are taking shape.

The way my life works, if I hold off on the garden, we'll be in this house for years. But if I plant my garden the odds of a buyer showing up tomorrow rises significantly. Whichever inconvenient scenario presents itself, at least I can count on being able to eat.

The one gripe I have is that I'm still living out of boxes. There is no way around it unless I want to pack up an entire house when the time comes - however far away that might be. In the meantime, I'm trying to pare down my collection of stuff, if only to be able to find things when I need them. Like a farm-style bowl I received for Christmas. I know it's around somewhere, because I personally packed it when we last moved. Ok, maybe I don't need the bowl, but I would like to use it. 

What might I put in said bowl? Perhaps a slice of strawberry oat cake - my most recent experiment. Or some vegan blueberry macaroons, a recipe in progress. I'm also playing around with jackfruit, coffee flour, Everything seasoning and oven baked waffles. Lots of bloggy things to look forward to!

Despite it being Cinco de Mayo, the theme today is non-Mexican flavored stuffed peppers. Why? Probably because I'm on a broccoli kick lately. Can't think of one dish I ever saw in Mexico that contained broccoli. And tahini is a decidedly non-Mexican flavor that I just had to use, so there you go. These are festive looking however, and they taste delicious! 
Picture
Ingredients:

Salad:
3 large bell peppers, halved and seeded
1 tablespoon olive oil
1 shallot, halved and sliced thin
1 cup broccoli florets, finely chopped
1/2 cup cauliflower, finely chopped
1 cup mushrooms, chopped
2/3 cup cooked quinoa
1 carrot, finely grated

salt and freshly ground black pepper to taste

Dressing:
1 avocado, pitted
1 tablespoon tahini
juice of 1 orange
1 tablespoon white balsamic vinegar
1/2 teaspoon honey
salt and freshly ground black pepper to taste

Directions:
Pre-heat the oven to 375ºF. Line a sheet pan with foil or parchment paper and evenly space the pepper halves on the pan.

In a saute pan, heat the oil over medium-high. Add the shallot, broccoli and cauliflower, cooking until lightly browned, about 5 minutes. Add the mushrooms. Continue cooking until the mushrooms are soft and any liquid is absorbed. Remove from heat. Stir in the quinoa, carrot, salt and pepper. Spoon the filling into the peppers. Bake for 20-30 minutes, or until peppers begin to brown. Tip: For softer peppers, parboil before baking.

In a blender or food processor, combine all ingredients for the dressing. Taste, adding more salt and pepper as needed. Drizzle over the cooked peppers when ready to serve.

Yield: 6 servings
Pin It
0 Comments

Epicure & Culture: Steak & Ale Pie

4/24/2017

0 Comments

 
A huge thank you to Jessica Festa over at Epicure & Culture for the feature!

Epicure & Culture is an online magazine exploring the cultural side of travel via food, drink and the local people. ​In this article, I share my tips on finding the best steak and ale pie within Scotland, a history of the dish and my own at-home recipe. Click here to read the full article.
Picture
Pin It
0 Comments

Creamy Broccoli Pasta {Vegan}

4/19/2017

0 Comments

 
Picture
All of the newly flavored hummus products hitting the market have captured my attention. Pickled beet, carrot with apricot, edamame, and in this case white bean with roasted red pepper. If you think about it, their consistency closely resembles a pesto. So it only makes sense to use these products as a sauce. Weeknight meal prep just got easier!

Use any brand that you like. Currently, I enjoy Eat Well Embrace Life by Lantana (not an affiliate or sponsor of this blog). These hummus products are great on their own, but when making a sauce, I like to doctor them just a bit with spices, salt and pepper. Particularly if pasta water is needed to thin it out, which should be done sparingly to preserve flavor. The resulting texture is rich and creamy, very much like an Alfredo sauce but without the dairy. 

Other vegetables that work well in this dish include mushrooms, spinach, grape tomatoes or a primavera mixture of julienned carrots, onion and zucchini. 

If you're wondering what to serve alongside, try a garden salad and a glass of your favorite white wine. Here's to fine vegan eating!
Picture
Picture
Ingredients:
2 cups dry gluten free or regular penne pasta
1 tablespoon olive oil
1 cup fresh or frozen broccoli florets, chopped
1 garlic clove, minced
1/4 cup white bean hummus
1/8 teaspoon chili powder
salt and crushed black pepper to taste

Directions:
Cook the penne according to package directions. Strain the pasta, reserving one ladle-full of pasta water.

In a sauté pan, heat the oil and broccoli over medium-high until cooked through. Add the garlic, allowing to cook for another minute. Remove from heat and stir in the hummus, chili powder, salt and pepper. Toss the pasta with the sauce to coat. If the sauce is too thick, add a little of the reserved pasta water to thin it out. 

Yield: 2-4 servings
Pin It
0 Comments

Vegetable & Pesto Au Gratin

4/14/2017

0 Comments

 
Picture
While everyone else is all about chocolate bunnies and Easter eggs, this weekend I'm thinking about the vegetable situation. Mainly, what to do for a side dish when the family gets together. 

My lightened up approach to potato au gratin subs in eggplant, zucchini, pesto and lots of cheese! This is one of those dishes that anyone can make. All you have to do is slice, layer and bake. Easy! 

Included in the recipe is a homemade pesto, but store-bought is fine too. If you're serving a traditional lamb, a mint pesto will work well. In this case, I went the basil route because we typically have ham or a roast for Easter.

I love breaking out my beat-up, eggshell blue, French inspired pan. This particular pan has never been anywhere near France, but it looks like I could have purchased it there. So, if you have an old pan or baking dish that you love, show it off. And let someone else cook the potatoes. This is much easier!
Picture
Step 1: Spread the pesto mixture evenly over the bottom of the baking dish.
Picture
Step 2: Place the eggplant slices over the pesto, starting with the largest slices first.
Picture
Step 3: Sprinkle a third of the lemony cheese mixture over the eggplant. 
Picture
Step 4: Layer the sliced zucchini over the cheese.
Picture
Step 5: Sprinkle the remaining cheese onto the zucchini.
Picture
Step 6: Spoon the pesto into any gaps between the layered zucchini.
Picture
Ingredients:

Pesto:
1 bunch fresh basil, stems removed 
2 cloves garlic
3/4 cup grated Parmesan cheese
1/2 cup sliced almonds
1 cup extra virgin olive oil
salt and freshly ground pepper to taste

Directions:
To make the pesto, puree all ingredients in a high speed blender or food processor. Store in an airtight container until ready to use.

Au Gratin:
1 cup pesto, homemade or store-bought
1 large eggplant, peeled and sliced
Kosher salt
zest of 1 lemon

1 cup freshly grated Parmesan cheese
freshly ground black pepper

2 zucchini, sliced

Directions:
Place the eggplant on a plate and sprinkle generously with salt. Allow to sit for 30 minutes, then rinse with cold water.

Pre-heat the oven to 400ºF.  Evenly spread a quarter of the pesto into a baking dish. Place the eggplant slices over the pesto layer. In a bowl, toss together the lemon zest, cheese and pepper. Sprinkle a third of the cheese mixture over the eggplant. Layer with the zucchini slices. Cover with the remaining lemon, cheese and pepper. Spoon the remaining pesto along any open spaces between the zucchini slices. Bake for 40-45 minutes or until bubbling and golden. Turn the broiler on high and cook for 1 minute to finish it off. 

Yield: 12-18 servings
Pin It
0 Comments

Lemon Pepper Meatballs & Quinoa Stir Fry

3/28/2017

0 Comments

 
Picture
Today's meatball recipe was created on a whim. My taste buds have literally been all over the map, of late. From Indian sauces, to Mediterranean flavored salads and Asian spiced vegetables. I needed a versatile protein source that was healthy, filling and easy to pair with just about anything.

Hello lemon pepper meatballs! Extremely easy to make with just four ingredients. Lemon pepper seasoning is available in nearly any grocery shop. Chances are you have some stashed in your pantry right now. It can also be made at home by blending garlic and onion powders, lemon zest, black pepper and salt. For quick clean up, simply line a sheet pan with foil. 
Picture
It would be remiss of me to simply state how versatile these meatballs are, and not provide any suggestions of what to serve with them. If carbs are not an issue, you might consider pairing with a marsala or garlic and oil pasta dish. Use as a topping on white pizza. Or toss into a Middle Eastern style gravy and serve over rice. 

Below is a quick quinoa stir fry that is a staple in my own home. I usually cook a large batch of plain quinoa. During the week, I can toss it with any vegetables, frozen or fresh, that I have on hand. Then I might add pesto, General Tso's or thai sweet chili sauce, lemon juice - whatever strikes my fancy. The recipe here is flavored with vinegar, salt and pepper. A super easy, flavorful meal for anyone trying to eat as nutritiously as possible.
Picture
Lemon Pepper Meatballs:

Ingredients:
olive oil spray
1 large egg or 2 egg whites
1 lb. ground white meat turkey
1 cup frozen cauliflower rice, thawed
1 teaspoon lemon pepper seasoning

Directions:
Line a sheet pan with foil, spray with oil and pre-heat the oven to 375ºF.

In a bowl, whisk the egg then add the turkey, cauliflower and seasoning. Mix well. Hand roll the mixture into small balls and place on the baking sheet. Bake for 20-25 minutes until golden brown, using tongs to flip the meatballs about halfway through the cooking process.

​Tip: If the mixture does not hold its shape, refrigerate for 30 minutes before rolling.

Yield: approximately 16 small meatballs


Quinoa Stir Fry:

Ingredients:
1 tablespoon olive oil
1/2 cup sliced mushrooms
1/2 cup sliced peppers
1 cup cooked quinoa
​2 tablespoons white balsamic vinegar
salt and pepper, to taste

1/3 cup chopped fresh baby spinach

Directions:
In a sauté pan, heat the oil over medium high. Add the mushrooms and peppers, cooking until just softened. Stir in the quinoa, vinegar, salt and pepper. Remove from heat and toss with the spinach immediately before serving.

Yield: 2 servings
Pin It
0 Comments

Brussels Sprout Salad with Tahini-Medjool Dressing

3/10/2017

0 Comments

 
Picture
Anyone who has ever had a roommate might relate to the experience of being assaulted by the stench of poorly cooked food. This recently happened to me, when someone with whom I had been sharing a kitchen tried to make Brussels sprouts. Whatever was done left the entire house smelling of boiled cabbage for more than a day. Based on the discarded remains tossed in the backyard, I could only assume the flavor wasn't much better. It was a happy surprise for my dogs, vulturous creatures who long ago learned to snatch and scurry away with any garbage they could find. Definitely not reliable barometers for good taste.

Brussel sprouts are one of those foods that can be wonderful in the hands of a good cook, or stomach turning in those of a bad one. And once ruined, the desire to ever want to eat them again rarely returns. So I'm here to show you (and remind myself) of how tasty this vegetable can be when prepared well. Using fresh over frozen sprouts is preferable. Frozen sprouts are already cooked, making it all too easy to overcook them during the reheating process, causing a compound called sulforaphane to be released which emits that terrible odor. To get the most flavor out of this cruciferous vegetable, it is best to season with salt, pepper and a little sweetness. This will reduce any bitterness. Acids such as lemon juice and vinegar also work well. 

Let's go through a quick rundown of how Brussels sprouts can improve your health:
  1. When eaten daily, they release a team of multi-taskers, meaning the compounds they contain work synergistically to prevent many chronic diseases such as colon, lung, oral and reproductive cancers, macular degeneration, heart disease, inflammation and oxidative stress which accelerate the aging process. Studies show that in some cases, these compounds may reverse diseases that are already present.
  2. They contain a long list of essential micronutrients in abundance, such as: ​Vitamin K​ - helps with blood coagulation and calcium absorption, Vitamin A - strengthens the immune system and maintains healthy vision, Vitamin C - used to grow and repair all parts of the body including bones, cartilage, tissue and skin, Potassium - regulates sodium levels, among many others.
  3. The macronutrient content is substantial enough to help curb the appetite with nearly 9 grams of carbohydrates, 3 grams of protein and 3 grams of fiber per serving, with no fat or cholesterol to adversely affect your calorie intake or overall health. This is particularly useful for weight management.

This recipe could not be easier! Be sure to choose bright green, tightly compact sprouts for a fresher presentation. Leftovers store well for a few days in the fridge, and can be transformed into a beautiful side dish by lightly sautéing or roasting. The dressing is akin to a honey mustard sauce, but with the tahini and Medjool dates, has a bit more depth of flavor. 

To those who regularly visit this blog, expect the posts to become more frequent now. Slowly, I'm getting back to it as I wrap up the side project I've been immersed in for the past year and return to normal life. I describe this project in more detail in my last post {Vegan} Raspberry Rice Krispie Treats for those who haven't a clue what I'm referring to. Also, be sure to look for me here: Instagram - Pinterest - Foodgawker
Picture
Ingredients:
Salad:
​10 Brussels sprouts
​1 tablespoon olive oil
2 medium shallots, sliced thin
5 Medjool dates, pitted and sliced lengthwise
salt and pepper, to taste
4 tablespoons crushed pecans, optional*

Dressing:
5 Medjool dates, pitted
1 tablespoon tahini
1/2 teaspoon Dijon mustard
1 tablespoon white balsamic vinegar
1/8 cup olive oil
3-4 tablespoons hot water
salt and pepper, to taste

Directions:

Peel off any loose leaves, then thinly slice each of the Brussels sprouts. Place in a bowl and set aside.

In a sauté pan, heat the oil over medium-high. Cook the shallots, stirring frequently until lightly browned. Add the dates, salt and pepper and continue cooking for another minute. Remove from heat and toss with the Brussels sprouts.

To make the dressing, add all of the ingredients to a blender, pureeing until smooth. When ready to serve, spoon the dressing onto the salad, tossing until lightly coated. Sprinkle with pecans, if using.

Yield: 2-4 servings

0 Comments

{Vegan} Raspberry Rice Krispie Treats

2/14/2017

0 Comments

 
Picture
Happy Valentine's Day!

Today, these Raspberry Rice Krispie Treats seem just the right recipe to share. They are sweet and sour, which in my mind, defines the emotional spectrum that many of us experience this time of year. Not to mention that my Caramel Kamut Krispie Treats continue to be one of my most popular posts, and are overdue for a follow-up companion recipe!

My husband and I occasionally celebrate Valentine's Day, but more often we agree that it is too gimicky for our taste, putting a lot of strain on even the best relationships. Though my husband does have the quirky habit of buying me candy the day after the holiday, so that he can get the 50% markdown. Which I find absolutely hilarious and impossibly annoying at that same time. But this year, we are neck-deep in a labor of love that is both joyful and very stressful. There is not much left to spare on discounted candy for the moment.

Right now, we are in the midst of trying to flip a house. Which in theory should not be terribly hard with my background in real estate and my husband's in construction. I refer to it as our "Radical Side Hustle House," because for me it is a step on a path to possible early retirement and something that I work on in between training clients and trying to build this blog. But for my husband it is a new full-time business venture. It is also why, more recently, my posts here are less frequent. In my limited, less experienced way, I am trying to contribute what I can to help complete this project.

For this to happen, we sold our beautiful home, put most of our things into storage, moving with our 2 dogs and 1 cat into a relative's house where we try to co-exist peacefully with one bathroom and a semi-functional kitchen. The arrangement is awkward, and after more than a year of this set-up, let's just say it's getting a bit stale for everyone! 

We have also cut way back on everyday joys, like shopping, eating out and going to the movies to ensure that we're not mindlessly overspending. I even cancelled a 40th birthday trip to NYC and asked my husband not to buy me anything. He did anyway, ironically bringing home all the just released full-price Valentine's stuff (my birthday was weeks ago), which made me laugh. 

Do we have to go to this extreme? Maybe not. I tend to be ultra conservative. More so when I feel unsettled with so many unknowns in our future. It's a mindset. I grew up feeling very poor, even though I had plenty of food and things to entertain myself. But my discipline and frugality coupled with my husband's amazing work ethic will likely see us through this and into a better position than when we began.


Currently we are in the last quarter of the renovation stage. I'm in charge of the budget - paying the bills, organizing and recording the receipts for labor/materials, trying not to stress my husband out with my stress about the budget, house demolition work (complete), co-designing the house itself plus various painting and clean-up projects. My husband is the general contractor, completing many of the renovations himself or with the help of other contractors, as the budget allows. Our plan is to have the property on the market by spring, move into it until it sells, then acquire a smaller inexpensive home while we continue on this new path. The ultimate goal being to flip a few houses until we build up enough to afford a multitude of rental properties.
Picture
Behold Our Labor of Love! 
That about sums up the sweet and sour of how I am living right now, minus a few details. I still actively blog, just not as frequently as before. Eventually, I will return to posting at least twice a week.

Also in the pipeline are two e-books that I have started to write - one on planning a manageable, affordable first-time trip to Scotland. The second is a vegan cookbook, the specifics of which I am withholding until closer to completion. 

In the meantime, if you tend to crave fruity things like sour gummy candies or twizzlers, give these Raspberry Rice Krispie Treats a try. They are incredibly simple and quick to make. I prefer them just as pictured, or occasionally dipped in chocolate for extra sweetness.
I Quit Sugar Kids Cookbook - PRINT
Picture
Ingredients:
​1/2 cup freeze dried raspberries, plus 1/2 cup reserved
1/3 cup solid coconut oil
2/3 cup brown rice syrup
1 tablespoon pure vanilla paste or 1 teaspoon extract
4 cups brown Rice Krispie cereal

Directions:
Line a loaf pan with parchment paper and set aside.

In a blender, grind the first 1/2 cup of the raspberries into a powder. Using a large non-stick saucepan, melt the oil and syrup over medium-high heat. Stir in the vanilla and ground raspberries. Bring to a boil and remove from heat. Fold in the cereal and reserved whole raspberries until completely coated. Firmly and evenly press the mixture into the lined pan using a rubber spatula. Refrigerate until firm, about 30 minutes. Use the parchment paper to lift from the pan. With a chef's knife, carefully cut into 8 squares. Store at room temperature. 

​Yield: 8 bars
0 Comments

Italian Kale & Bean Soup

2/6/2017

0 Comments

 
Picture
A simple soup. And a life full of chaos. 

For those of you who have been following along on my blog journey, thank you for being patient and my apologies for being absent. I will get more in depth as to why I have been a bit MIA in my next post. In a roundabout way, it ties into the Valentine's themed recipe I have coming up.

In the meantime, I have been trying out nutritional yeast and lots of simple prep meals. Gradually, I am trying to ween myself off of cheese. Or to have a bit less of it if nothing else. It is the one holdout of all the dairy products I have cut from my diet due to severe lactose intolerance. Since hard, aged cheese contains very little of the sugar lactose, those of us missing the enzyme lactase are better able to digest certain cheeses with minimal symptoms. But, these cheeses also contain high amounts of saturated fat and sodium. 

Nutritional yeast is a pasteurized inactive yeast that contains a variety of B-Vitamins, high levels of protein, fiber and a variety of minerals such as iron, potassium and zinc. It is grown on beet molasses or cane sugar and is a completely different, beneficial strain of yeast than Candida albicans, which is known for causing illness due to overgrowth. For those trying to avoid GMO products, look for organic and/or cane sugar grown nutritional yeast products, as sugar beets tend to be genetically modified in the U.S. and currently, nutritional yeast is not approved for non-GMO certification.

Based on my research, it seems there is a bit of controversy surrounding an amino acid in nutritional yeast called glutamic acid, which is also present in MSG. In nutritional yeast, L-glutamic acid is a pure protein-bound, naturally occurring amino acid. It serves as a protein building block, but is also essential to the central nervous system, acting as a neurotransmitter. Even if we take every precaution to avoid consuming glutamic acid, our bodies can and do use other amino acids to produce it. In fact, glutamic acid is present in a great number of foods including meats, fish, hummus and soy. MSG, on the other hand, is factory made by breaking down L-glutamic acid using a chemical reaction that separates the glutamic acid from the protein it is bound to, and isolating the sodium salt component. Contaminants such as D-glutamic acid and carcinogens are introduced during production of MSG. These toxic byproducts and the extremely high sodium content are what contribute to the symptoms and illnesses many experience after consuming MSG. So to be clear, nutritional yeast is safe to eat and is free of MSG. The confusion lies in the fact that both products contain the same amino acid: one in its purest form, the other altered and refined.

Often described as nutty or cheesy, I personally find nutritional yeast to be a bit earthy in flavor. When sprinkled onto meals, it is milder and less salty than parmesan. I think it takes a little getting used to if you are a loyal and frequent consumer of cheese, but worth trying. Give it a chance the next time you make a nice soup, like my version of Tuscan Bean Soup. 

Bon Appétit!
Picture
Ingredients:
olive oil
1 small red onion, minced
1 celery stalks, diced
1 carrots, diced
1 tomato, chopped
1 cup chopped kale
1 cup white kidney beans
1 tablespoon poultry seasoning
salt and freshly ground black pepper, to taste
2 cups vegetable broth or water
​1/4 cup nutritional yeast

Directions:
In a sauce pan, heat the oil and add the onion, celery and carrots. Saute over medium-high heat until the onion becomes translucent. Add all of the remaining ingredients, except the nutritional yeast. Turn the heat to low, cover and simmer for 20 minutes. When ready to serve, spoon into serving bowls and sprinkle each with a tablespoon of nutritional yeast or parmesan cheese. Serve with warm bread or a side salad.

Yield: 4 servings
0 Comments
<<Previous
Forward>>
    Fitness Training:
    Located in the Hudson Valley or Westchester NY? Contact me for a trial in-home fitness training session!

    Author

    Sarah Inglis is a increasingly vegetarian non-vegetarian, as well as a certified fitness trainer, personal chef, freelance writer and food photographer with degrees in media communications and dietetics. This blog is a collection of healthy recipes, along with a bit of fitness & nutritional information.

    Links

    Affiliate links to products I use and think are great are posted on this site. This means I receive a small commission if you purchase a product through these links, though at no extra cost to you. This is both to cover costs for the blog and to provide helpful tools to the reader. Thank you for supporting Embody Fitness & Nutrition!

    Categories

    All
    Appetizers
    Breakfast
    Burgers/Sandwiches/Tacos
    Desserts
    Entrees
    Fitness Info
    Juice Recipes
    Nutritional Info
    Salad
    Sides
    Snacks
    Soup
    Toppings
    Travel

    Archives

    January 2018
    December 2017
    September 2017
    August 2017
    July 2017
    June 2017
    May 2017
    April 2017
    March 2017
    February 2017
    January 2017
    December 2016
    November 2016
    October 2016
    September 2016
    August 2016
    June 2016
    May 2016
    April 2016
    March 2016
    February 2016
    January 2016
    December 2015
    November 2015
    October 2015
    September 2015
    July 2015
    June 2015
    May 2015
    April 2015
    March 2015

    RSS Feed

© 2015-2018 Embody Fitness & Nutrition. All rights reserved. No content or images may be reproduced in any part or form without written permission.
Proudly powered by Weebly